


*本文由RS components 贊助發表,轉載自DesignSpark部落格原文連結
| 作者/攝影 | 張嘉鈞 |
| 難度 |
★★☆☆☆(普通) |
| 材料表 |
|
目錄
- 對齊RGB跟Depth畫面並去除背景 ( align-depth2color.py )
- 解決掉幀問題 ( frame_queue_example.py )
- 讀取預錄好的深度影像方式 ( read_bag_example.py )
- 結語
對齊RGB跟Depth畫面並去除背景 ( align-depth2color.py )
這個範例呈現如何將一公尺以外的內容進行去背,此範例的核心價值在於深度影像跟彩色影像如何對齊,對齊後又該使用什麼方式去除背景。
首先,先導入函式庫與宣告 RealSense物件 ( pipeline ) 與定義串流物件 ( config ):
[pastacode lang=”python” manual=”%23%20%E5%B0%8E%E5%85%A5%E5%87%BD%E5%BC%8F%E5%BA%AB%0A%0Aimport%20pyrealsense2%20as%20rs%0Aimport%20numpy%20as%20np%0Aimport%20cv2%0A%0A%23%20%E5%BB%BA%E7%AB%8B%E4%B8%80%E5%80%8Bcontext%E7%89%A9%E4%BB%B6%E5%AD%98%E6%94%BE%E6%89%80%E6%9C%89%20RealSense%20%E7%9A%84%E8%99%95%E7%90%86%E5%87%BD%E7%A4%BA%0A%0Apipeline%20%3D%20rs.pipeline()%0A%0A%23%20%E9%85%8D%E7%BD%AE%E4%B8%B2%E6%B5%81%E7%89%A9%E4%BB%B6%0A%0Aconfig%20%3D%20rs.config()” message=”” highlight=”” provider=”manual”/]
接著可以透過wrapper去確認接上去的設備是L500系列還是D400系列,進而去調整RGB攝影機的解析度,最後定義完就可以開啟影像串流,細部的介紹可以參閱上篇程式詳解之內容:
再來就是我們這次範例的重頭戲了 – 對齊,這邊要對齊的不僅是影像也有深度資訊,RealSense感測器獲得的深度資訊如何轉換成實際的公尺單位?深度影像跟RGB影像如何進行畫面對齊?
首先,先來處理深度單位的轉換,我們先取得深度感測器的物件,透過get_depth_scale取得到「RealSense的深度資訊與實際公尺單位的轉換比例」,接著我們要求一公尺以外的資訊要進行去背,所以定義了 clipping_distance_in_meters,但現在定義的是公尺單位需要轉換成深度資訊,所以這邊會再除以剛剛透過get_depth_scale取得到的數值,這樣就能成功轉換成對應的RealSense深度數值了:
[pastacode lang=”python” manual=”%23%20%E5%8F%96%E5%BE%97%E6%B7%B1%E5%BA%A6%E6%84%9F%E6%B8%AC%E5%99%A8%E7%89%A9%E4%BB%B6%0A%0Adepth_sensor%20%3D%20profile.get_device().first_depth_sensor()%0A%23%20%E5%8F%96%E5%BE%97%E6%B7%B1%E5%BA%A6%E6%84%9F%E6%B8%AC%E5%99%A8%E7%9A%84%20%E6%B7%B1%E5%BA%A6%E8%B3%87%E8%A8%8A%E8%88%87%E5%AF%A6%E9%9A%9B%E5%85%AC%E5%B0%BA%E4%B9%8B%E9%96%93%E7%9A%84%20%E6%98%A0%E5%B0%84%E5%B0%BA%E5%BA%A6%20%0A%0A%23%20get_depth_scale%20-%3E%20Retrieves%20mapping%20between%20the%20units%20of%20the%20depth%20image%20and%20meters%0A%0Adepth_scale%20%3D%20depth_sensor.get_depth_scale()%0Aprint(%22Depth%20Scale%20is%3A%20%22%20%2C%20depth_scale)%0A%0A%23%20%E5%AE%A3%E5%91%8A%E5%A4%9A%E5%B0%91%E5%85%AC%E5%B0%BA%E4%BB%A5%E5%85%A7%E7%9A%84%E8%B3%87%E8%A8%8A%E8%A6%81%E9%A1%AF%E7%A4%BA%0A%0Aclipping_distance_in_meters%20%3D%201%20%0A%231%20meter%0A%0A%23%20%E5%B0%87%20%E5%85%AC%E5%B0%BA%E8%B3%87%E8%A8%8A%20%E8%BD%89%E6%8F%9B%E6%88%90%20RealSense%20%E7%9A%84%20%E6%B7%B1%E5%BA%A6%E5%96%AE%E4%BD%8D%20%0A%0Aclipping_distance%20%3D%20clipping_distance_in_meters%20%2F%20depth_scale” message=”” highlight=”” provider=”manual”/]緊接著就要來處理深度影像跟彩色影像的對齊,當初在opencv_viewer那個範例我們為了顯示在一起會使用cv2.resize的方式,但是並不是最好的做法( 圖片會被壓縮變形),pyrealsense提供的對齊方式是align,我們可以透過 rs.align()去處理深度影像需要對齊的內容,這邊就是以彩色影像 ( rs.stream.color )為基礎進行對齊,最後可以使用 process() 來實現對齊的動作,後續會再說明:
[pastacode lang=”python” manual=”%23%20%E5%BB%BA%E7%AB%8B%20%E5%B0%8D%E9%BD%8A%20%E7%89%A9%E4%BB%B6%20(%20%E4%BB%A5%20color%20%E7%82%BA%E5%9F%BA%E6%BA%96%20)%0A%0Aalign_to%20%3D%20rs.stream.color%0A%23%20rs.align%20%E8%AE%93%20%E6%B7%B1%E5%BA%A6%E5%9C%96%E5%83%8F%20%E8%B7%9F%20%E5%85%B6%E4%BB%96%E5%9C%96%E5%83%8F%20%E5%B0%8D%E9%BD%8A%0A%0Aalign%20%3D%20rs.align(align_to)%0A%0A%23%20%E4%BD%BF%E7%94%A8%20process%20%E4%BE%86%E5%AF%A6%E7%8F%BE%E5%89%9B%E5%89%9B%E5%AE%A3%E5%91%8A%E7%9A%84%20align%20%E5%B0%8D%E9%BD%8A%E5%8A%9F%E8%83%BD%0A%0A%23%20aligned_frames%20%3D%20align.process(frames)%0A” message=”” highlight=”” provider=”manual”/]上面定義完之後就可以進行即時影像的擷取與處理了,一樣透過 wait_for_frames等待最新的複合式影像物件( frames) 包含彩色影像跟深度影像,接著直接使用 align.process 將深度影像對齊彩色影像:
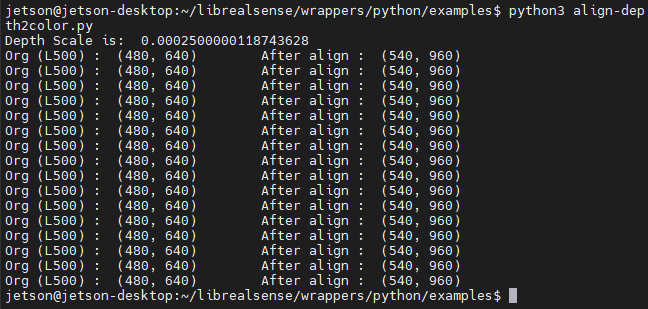
對齊完之後就可以透過get_depth_frames跟get_color_frames來取得影像了,這邊我也取得了原先的影像,最後註解的地方如果解除註解就會看到原先的解析度跟轉換後的解析度:
[pastacode lang=”python” manual=”%23%20%E5%8F%96%E5%BE%97%E5%B0%8D%E9%BD%8A%E5%BE%8C%E7%9A%84%E5%BD%B1%E5%83%8F%0A%0A%20%20%20%20%20%20%20%20depth_frame%20%3D%20frames.get_depth_frame()%0A%20%20%20%20%20%20%20%20aligned_depth_frame%20%3D%20aligned_frames.get_depth_frame()%20%0A%23%20aligned_depth_frame%20is%20a%20640×480%20depth%20image%0A%0A%20%20%20%20%20%20%20%20color_frame%20%3D%20aligned_frames.get_color_frame()%0A%0A%20%20%20%20%20%20%20%20%0A%23%20%E9%A9%97%E8%AD%89%E6%98%AF%E5%90%A6%E9%83%BD%E6%9C%89%E5%BD%B1%E5%83%8F%0A%0A%20%20%20%20%20%20%20%20if%20not%20aligned_depth_frame%20or%20not%20color_frame%3A%0A%20%20%20%20%20%20%20%20%20%20%20%20continue%0A%0A%20%20%20%20%20%20%20%20%0A%23%20%E8%BD%89%E6%8F%9B%E6%88%90%20numpy%20%0A%0A%20%20%20%20%20%20%20%20depth_image%20%3D%20np.asanyarray(aligned_depth_frame.get_data())%0A%20%20%20%20%20%20%20%20color_image%20%3D%20np.asanyarray(color_frame.get_data())%0A%0A%20%20%20%20%20%20%20%20%0A%23%20%E9%A1%AF%E7%A4%BA%E8%A7%A3%E6%9E%90%E5%BA%A6%0A%0A%20%20%20%20%20%20%20%20%0A%23%20print(‘Org%20(L500)%20%3A%20’%2C%20np.shape(np.asanyarray(depth_frame.get_data()))%2C%20end%3D’%5Ct’)%0A%0A%20%20%20%20%20%20%20%20%0A%23%20print(‘After%20align%20%3A%20’%2C%20np.shape(np.asanyarray(aligned_depth_frame.get_data())))%0A%0A%20″ message=”” highlight=”” provider=”manual”/]註解掉之後可以發現,解析度從原本的 640×480變成了 960×540:
緊接著就是去背問題,我們可以直接透過dstack的方式去將一個維度的資料複製成三個維度(範例結尾有補充說明),這樣影像的資訊就好比一張灰階照片,接著使用 np.where即可進行條件去背。這邊要注意的是depth_image_3d裡面的數值代表的還是屬於深度資訊;np.where(condition, x, y) 滿足 condition 輸出 x 否則輸出 y,滿足距離大於1公尺以及辨識不出來這兩個條件的就輸出 grey_color,沒有滿足的就輸出 color_image:
[pastacode lang=”python” manual=”%23%20%E5%88%AA%E9%99%A4%E8%83%8C%E6%99%AF%20%3A%20%E5%B0%87%E8%83%8C%E6%99%AF%E9%A1%8F%E8%89%B2%E8%AA%BF%E6%95%B4%E6%88%90%20%E7%81%B0%E8%89%B2%20%0A%0A%20%20%20%20%20%20%20%20grey_color%20%3D%20153%0A%20%20%20%20%20%20%20%20%0A%23%20%E6%B7%B1%E5%BA%A6%E5%BD%B1%E5%83%8F%E5%8F%AA%E6%9C%89%201%20%E5%80%8B%20channel%EF%BC%8C%E9%80%8F%E9%81%8E%20dstack%20%E5%BB%BA%E7%AB%8B%20%E7%81%B0%E9%9A%8E%E5%9C%96%20(%20%E9%80%99%E9%82%8ARGB%E7%9A%84%E6%95%B8%E5%80%BC%E5%B0%B1%E6%98%AF%20%E6%B7%B1%E5%BA%A6%E8%A8%8A%E6%81%AF%20)%0A%0A%20%20%20%20%20%20%20%20depth_image_3d%20%3D%20np.dstack((depth_image%2C%20depth_image%2C%20depth_image))%20%0A%23depth%20image%20is%201%20channel%2C%20color%20is%203%20channels%0A%0A%20%20%20%20%0A%20%20%20%20%20%20%20%20%0A%23%20%E7%95%B6%20%E6%B7%B1%E5%BA%A6%E5%A4%A7%E6%96%BC%201%20%E5%85%AC%E5%B0%BA%20%E6%88%96%E6%98%AF%20%E5%81%B5%E6%B8%AC%E4%B8%8D%E5%87%BA%E4%BE%86%20%E5%B0%B1%E6%9C%83%20%E4%BB%A5%20grey_color%20%E5%8F%96%E4%BB%A3%0A%0A%20%20%20%20%20%20%20%20bg_removed%20%3D%20np.where((depth_image_3d%20%3E%20clipping_distance)%20%7C%20(depth_image_3d%20%3C%3D%200)%2C%20grey_color%2C%20color_image)” message=”” highlight=”” provider=”manual”/]最後將深度圖跟去背圖合併並且當偵測到按下按鈕「q」就會關閉所有視窗:
[pastacode lang=”python” manual=”%23%20%E5%B0%87%E6%B7%B1%E5%BA%A6%E5%BD%B1%E5%83%8F%E8%BD%89%E6%8F%9B%E6%88%90%20%E5%BD%A9%E8%89%B2%E5%BD%B1%E5%83%8F%0A%0A%20%20%20%20%20%20%20%20depth_colormap%20%3D%20cv2.applyColorMap(cv2.convertScaleAbs(depth_image%2C%20alpha%3D0.03)%2C%20cv2.COLORMAP_JET)%0A%20%20%20%20%20%20%20%20%0A%23%20%E5%90%88%E4%BD%B5%E5%9C%96%E5%83%8F%20%E5%B7%A6%E7%82%BA%E5%8E%BB%E8%83%8C%E5%9C%96%EF%BC%8C%E5%8F%B3%E7%82%BA%E6%B7%B1%E5%BA%A6%E5%9C%96%0A%0A%20%20%20%20%20%20%20%20images%20%3D%20np.hstack((bg_removed%2C%20depth_colormap))%0A%0A%20%20%20%20%20%20%20%20%0A%23%20cv2.namedWindow(‘Align%20Example’%2C%20cv2.WINDOW_NORMAL)%0A%0A%20%20%20%20%20%20%20%20cv2.imshow(‘Align%20Example’%2C%20images)%0A%20%20%20%20%20%20%20%20key%20%3D%20cv2.waitKey(1)%0A%20%20%20%20%20%20%20%20%0A%23%20Press%20esc%20or%20’q’%20to%20close%20the%20image%20window%0A%0A%20%20%20%20%20%20%20%20if%20key%20%26%200xFF%20%3D%3D%20ord(‘q’)%20or%20key%20%3D%3D%2027%3A%0A%20%20%20%20%20%20%20%20%20%20%20%20cv2.destroyAllWindows()%0A%20%20%20%20%20%20%20%20%20%20%20%20break%0Afinally%3A%0A%20%20%20%20pipeline.stop()” message=”” highlight=”” provider=”manual”/]到這邊這個範例就結束了!
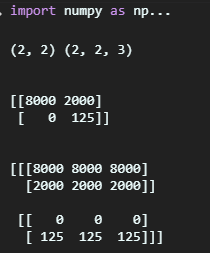
我在稍微針對np.dstack進行補充說明,下列範例是一個2x2的深度影像資訊,我們可以透過dstack轉換成三維度的影像:
[pastacode lang=”python” manual=”import%20numpy%20as%20np%0A%0Aa%20%3D%20np.asanyarray(%20%5B%5B8000%2C%202000%5D%2C%0A%20%20%20%20%20%20%20%20%20%20%20%20%20%20%20%20%20%20%20%20%5B0%2C%20125%5D%5D)%0A%0Ab%20%3D%20np.dstack((a%2Ca%2Ca))%0A%0Aprint(a.shape%2C%20b.shape)%0Aprint(‘%5Cn’)%0Aprint(a)%0Aprint(‘%5Cn’)%0Aprint(b)%0A%20″ message=”” highlight=”” provider=”manual”/]顯示的結果如下,原本是 ( 2, 2, 1) 變成了 ( 2, 2, 3):
而使用OpenCV顯示的話會類似下圖:

解決掉幀問題 ( frame_queue_example.py )
當我們在進行多個影像串流的時候總是會發生延遲問題導致掉幀,RealSense也提供了一些簡單的方式來處理這個問題。
首先要先製造掉幀的現象,這邊撰寫了slow_processing、slower_processing來模擬掉幀現象,這邊輸入的是影像物件,透過get_frame_number可以獲取現在的影像是第幾幀,於slow_processing我們每20幀就會暫停0.25秒;slower_processing則是每20幀就暫停1秒,用這種方式來模擬掉幀狀況:
[pastacode lang=”python” manual=”%23%20First%20import%20the%20library%0A%0Aimport%20pyrealsense2%20as%20rs%0Aimport%20time%0A%0A%23%20%E6%AF%8F20%E5%80%8Bframe%E6%9C%83%E6%9A%AB%E5%81%9C0.25%E7%A7%92%20%E8%A3%BD%E9%80%A0%E7%9F%AD%E6%9A%AB%E7%9A%84%E5%BB%B6%E9%81%B2%0A%0Adef%20slow_processing(frame)%3A%0A%20%20%20%20n%20%3D%20frame.get_frame_number()%20%0A%20%20%20%20if%20n%20%25%2020%20%3D%3D%200%3A%0A%20%20%20%20%20%20%20%20time.sleep(1%2F4)%0A%20%20%20%20print(n)%0A%23%20%E8%A3%BD%E9%80%A0%E6%9B%B4%E5%BB%B6%E9%81%B2%E7%9A%84%E7%8B%80%E6%B3%81%0A%0Adef%20slower_processing(frame)%3A%0A%20%20%20%20n%20%3D%20frame.get_frame_number()%20%0A%20%20%20%20if%20n%20%25%2020%20%3D%3D%200%3A%0A%20%20%20%20%20%20%20%20time.sleep(1)%0A%20%20%20%20print(n)” message=”” highlight=”” provider=”manual”/]接著與先前一樣先取得RealSense的物件並且宣告影像串流物件:
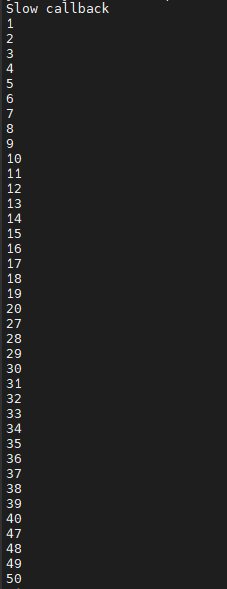
[pastacode lang=”python” manual=”try%3A%0A%20%20%20%20%0A%23%20Create%20a%20pipeline%0A%0A%20%20%20%20pipeline%20%3D%20rs.pipeline()%0A%0A%20%20%20%20%0A%23%20Create%20a%20config%20and%20configure%20the%20pipeline%20to%20stream%0A%0A%20%20%20%20%0A%23%20%20different%20resolutions%20of%20color%20and%20depth%20streams%0A%0A%20%20%20%20config%20%3D%20rs.config()%0A%20%20%20%20config.enable_stream(rs.stream.depth%2C%20640%2C%20480%2C%20rs.format.z16%2C%2030)” message=”” highlight=”” provider=”manual”/]接下來會分成幾個部分來展示延遲以及改善的方式,一開始我們先確認之前寫的延遲程式有無問題,運行 slow_processing 5秒看成效如何:
[pastacode lang=”python” manual=”%20%20%20print(%22Slow%20callback%22)%0A%20%20%20%20%0A%23%20%E9%96%8B%E5%A7%8B%E5%BD%B1%E5%83%8F%E4%B8%B2%E6%B5%81%0A%0A%20%20%20%20pipeline.start(config)%0A%20%20%20%20%0A%23%20%E8%AE%93%20slow_processing%20%E9%81%8B%E8%A1%8C5%E7%A7%92%E5%B0%B1%E5%A5%BD%0A%0A%20%20%20%20start%20%3D%20time.time()%0A%20%20%20%20while%20time.time()%20-%20start%20%3C%205%3A%0A%20%20%20%20%20%20%20%20%0A%23%20%E5%8F%96%E5%BE%97%E6%9C%80%E6%96%B0%E7%9A%84%E5%BD%B1%E5%83%8F%E7%89%A9%E4%BB%B6%0A%0A%20%20%20%20%20%20%20%20frames%20%3D%20pipeline.wait_for_frames()%0A%20%20%20%20%20%20%20%20%0A%23%20%E9%81%8B%E8%A1%8Cslow_processing%0A%0A%20%20%20%20%20%20%20%20slow_processing(frames)%0A%20%20%20%20%0A%23%20%E9%97%9C%E9%96%89RealSense%E7%89%A9%E4%BB%B6%0A%0A%20%20%20%20pipeline.stop()” message=”” highlight=”” provider=”manual”/]成果如下,可以注意到當frame數到20的時候下一刻會變成27代表這0.25秒中間遺失了7個frame:
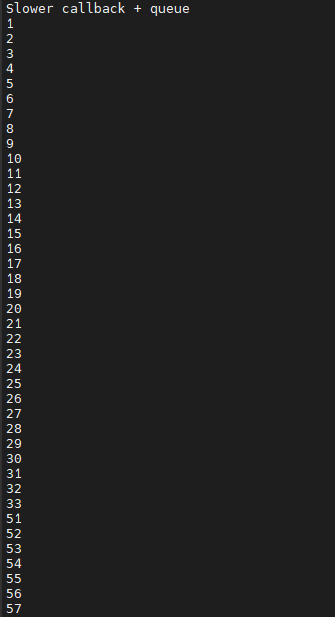
接著我們可以加上 queue 來將被丟失的幀存放在記憶體當中,frame_queue( ) 括弧當中的數值代表可以保存的幀數:
[pastacode lang=”python” manual=”%23%20%E5%8A%A0%E4%B8%8A%20queue%20%0A%0A%20%20%20%20print(%22Slow%20callback%20%2B%20queue%22)%0A%20%20%20%20%0A%23%20frame_queue(n)%20n%20%E6%98%AF%E5%8F%AF%E4%BB%A5%E4%BF%9D%E7%95%99%E5%A4%9A%E5%B0%91%E5%B9%80%EF%BC%8C%E9%80%99%E9%82%8A%E4%BF%9D%E7%95%99%E4%BA%8650%E5%B9%80%E7%9A%84%E7%A9%BA%E9%96%93%0A%0A%20%20%20%20queue%20%3D%20rs.frame_queue(50)%0A%20%20%20%20%0A%23%20%E9%96%8B%E5%95%9F%E4%B8%B2%E6%B5%81%0A%0A%20%20%20%20pipeline.start(config%2C%20queue)%0A%20%20%20%20%0A%23%20%E5%9F%B7%E8%A1%8C%E4%BA%94%E7%A7%92%0A%0A%20%20%20%20start%20%3D%20time.time()%0A%20%20%20%20while%20time.time()%20-%20start%20%3C%205%3A%0A%20%20%20%20%20%20%20%20frames%20%3D%20queue.wait_for_frame()%0A%20%20%20%20%20%20%20%20%0A%23%20%E4%B8%80%E6%A8%A3%E4%BD%BF%E7%94%A8%20slow_processing%0A%0A%20%20%20%20%20%20%20%20slow_processing(frames)” message=”” highlight=”” provider=”manual”/]結果如下,可以發現原本的在第20幀的時候會因為延遲而丟失7幀,加上了queue之後就沒有這樣的問題了,那待我們再來測試一下延遲更久的狀況:


一樣的程式碼只是我們將slow_processing 改成 slower_processing:
[pastacode lang=”python” manual=”%20%20%20%20print(%22Slower%20callback%20%2B%20queue%22)%0A%20%20%20%20queue%20%3D%20rs.frame_queue(50)%0A%20%20%20%20pipeline.start(config%2C%20queue)%0A%20%20%20%20start%20%3D%20time.time()%0A%20%20%20%20while%20time.time()%20-%20start%20%3C%205%3A%0A%20%20%20%20%20%20%20%20frames%20%3D%20queue.wait_for_frame()%0A%20%20%20%20%20%20%20%20slower_processing(frames)%0A%20%20%20%20pipeline.stop()” message=”” highlight=”” provider=”manual”/]結果如下,可以注意到雖然queue設到50但是因為延遲時間太久所以會導致queue無法進行備份最後直接捨棄掉pool裡的幀:
最後解決這種問題的方法就是keep_frames,我們在宣告frame_queue的時候加上這個參數,讓queue裡面的幀會被保留住:
[pastacode lang=”python” manual=”%20%20%20%20print(%22Slower%20callback%20%2B%20keeping%20queue%22)%0A%20%20%20%20queue%20%3D%20rs.frame_queue(50%2C%20keep_frames%3DTrue)%0A%20%20%20%20pipeline.start(config%2C%20queue)%0A%20%20%20%20start%20%3D%20time.time()%0A%20%20%20%20while%20time.time()%20-%20start%20%3C%205%3A%0A%20%20%20%20%20%20%20%20frames%20%3D%20queue.wait_for_frame()%0A%20%20%20%20%20%20%20%20slower_processing(frames)%0A%20%20%20%20pipeline.stop()” message=”” highlight=”” provider=”manual”/]這個範例如果介紹的有錯誤或不夠清楚,請在下方留言,也可以參考原廠資料:https://intelrealsense.github.io/librealsense/python_docs/_generated/pyrealsense2.frame_queue.html#pyrealsense2.frame_queue
錄製深度影像 (.bag)
介紹之前先講一下 rosbag (http://wiki.ros.org/rosbag),他是基於ROS所開發的一個紀錄工具,可以記錄機器人運行的數據資料以及影像等等的資訊。那可能因為RealSense開發者大部分是以機器人為主所以他們也直接使用相關的紀錄方式。
要錄製深度影響其實非常的簡單,你只需要在宣告config之後,在宣告enable_record_to_file() 即可,括弧當中應輸入檔案名稱,範例如下。
[pastacode lang=”python” manual=”%23%20%E5%BB%BA%E7%AB%8B%E4%B8%80%E5%80%8Bcontext%E7%89%A9%E4%BB%B6%E5%AD%98%E6%94%BE%E6%89%80%E6%9C%89%20RealSense%20%E7%9A%84%E8%99%95%E7%90%86%E5%87%BD%E7%A4%BA%0A%0Apipeline%20%3D%20rs.pipeline()%0A%0A%23%20%E9%85%8D%E7%BD%AE%E4%B8%B2%E6%B5%81%E7%89%A9%E4%BB%B6%0A%0Aconfig%20%3D%20rs.config()%0A%23%20%E5%BB%BA%E7%AB%8B%E3%80%8C%E6%B7%B1%E5%BA%A6%E3%80%8D%E5%BD%B1%E5%83%8F%E4%B8%B2%E6%B5%81%0A%0Aconfig.enable_stream(rs.stream.depth%2C%20640%2C%20480%2C%20rs.format.z16%2C%2030)%0A%0A%23%20%E5%B0%87%E5%BD%B1%E5%83%8F%E6%95%B8%E6%93%9A%E8%BC%B8%E5%87%BA%E5%88%B0%20test.bag%20%E7%95%B6%E4%B8%AD%0A%0Aconfig.enable_record_to_file(‘test.bag’)” message=”” highlight=”” provider=”manual”/]具體程式可以使用opencv_viewer_example.py來修改,成果在read_bag_example的demo可以看到 ( 下一個範例 ),我自己錄製的畫面。
讀取預錄好的深度影像方式( read_bag_example.py )
基本上看到這裡一些基本的動作讀者們應該都知道了,所以我這邊註解會少一些,第一步基本上就是導入函式以及宣告pipeline等等的,比較特別的是這邊config要增加一段 enable_device_from_file(config, ‘test.bag’),告訴config資料要從這個檔案讀取,而不是RealSense:
[pastacode lang=”python” manual=”import%20pyrealsense2%20as%20rs%0Aimport%20numpy%20as%20np%0Aimport%20cv2%0Aimport%20argparse%0Aimport%20os.path%0A%0Atry%3A%0A%20%20%20%20pipeline%20%3D%20rs.pipeline()%0A%0A%20%20%20%20config%20%3D%20rs.config()%0A%0A%20%20%20%20%0A%23%20%E5%91%8A%E8%A8%B4%20config%20%E8%B3%87%E8%A8%8A%E5%BE%9E%E6%AA%94%E6%A1%88%E8%AE%80%E5%8F%96%0A%0A%20%20%20%20rs.config.enable_device_from_file(config%2C%20’test.bag’)%0A%0A%20%20%20%20%0A%23%20%E4%B8%80%E6%A8%A3%E8%A6%81%E5%BB%BA%E7%AB%8B%E6%B7%B1%E5%BA%A6%E5%BD%B1%E5%83%8F%E4%B8%B2%E6%B5%81%0A%0A%20%20%20%20config.enable_stream(rs.stream.depth%2C%20rs.format.z16%2C%2030)%0A%0A%20%20%20%20%0A%23%20%E9%96%8B%E5%95%9F%E4%B8%B2%E6%B5%81%0A%0A%20%20%20%20pipeline.start(config)%0A%0A%20%20%20%20%0A%23%20%E5%AE%A3%E5%91%8A%E8%91%97%E8%89%B2%E5%99%A8%20%E9%A0%90%E8%A8%AD%E6%98%AF%20jet%20colormap%0A%0A%20%20%20%20colorizer%20%3D%20rs.colorizer()%3B” message=”” highlight=”” provider=”manual”/]接著我們就像一般使用一樣,取得frames、取得深度影像,轉換成numpy,用opencv顯示:
[pastacode lang=”python” manual=”%20%20%20%20while%20True%3A%0A%20%20%20%20%20%20%20%20%0A%20%20%20%20%20%20%20%20frames%20%3D%20pipeline.wait_for_frames()%0A%20%20%20%20%20%20%20%20depth_frame%20%3D%20frames.get_depth_frame()%0A%0A%20%20%20%20%20%20%20%20%0A%23%20%E5%B0%87%E6%B7%B1%E5%BA%A6%E5%BD%B1%E5%83%8F%E8%91%97%E8%89%B2%E6%88%90%20jet%20colormap%0A%0A%20%20%20%20%20%20%20%20depth_color_frame%20%3D%20colorizer.colorize(depth_frame)%0A%0A%20%20%20%20%20%20%20%20%0A%23%20%E8%BD%89%E6%8F%9B%E6%88%90%20numpy%20array%20%E8%AE%93%20opencv%20%E9%A1%AF%E7%A4%BA%0A%0A%20%20%20%20%20%20%20%20depth_color_image%20%3D%20np.asanyarray(depth_color_frame.get_data())%0A%0A%20%20%20%20%20%20%20%20%0A%23%20Opencv%20%E9%A1%AF%E7%A4%BA%E4%BB%A5%E5%8F%8A%E6%8C%89%E4%B8%8B%20q%20%E9%9B%A2%E9%96%8B%0A%0A%20%20%20%20%20%20%20%20cv2.imshow(%22Depth%20Stream%22%2C%20depth_color_image)%0A%20%20%20%20%20%20%20%20key%20%3D%20cv2.waitKey(1)%0A%20%20%20%20%20%20%20%20if%20key%20%3D%3D%2027%3A%0A%20%20%20%20%20%20%20%20%20%20%20%20cv2.destroyAllWindows()%0A%20%20%20%20%20%20%20%20%20%20%20%20break%0Afinally%3A%0A%20%20%20%20pass” message=”” highlight=”” provider=”manual”/]成果如下:
結語
我們詳解了總共六個範例,相信大部分的狀況,讀者們都已經可以Handle了!下一次將會介紹我們如何使用物件偵測搭配RealSense。
*本文由RS components 贊助發表,轉載自DesignSpark部落格原文連結


