專案資訊
前言
前一篇文章中,我們已經完成使用 Arduino IDE 開發,並將感測器數值顯示在 OLED 螢幕上。這次則進一步把資料顯示搬到網頁端,讓實驗過程中的觀察更方便。
如果沒有 Follow 到前一篇,這邊提供傳送門
而這篇文章的產生,是源自看似簡單的問題:
「電子鼻能不能分辨不同的精油?」
筆者使用的電子鼻系統,主要由多通道氣體感測器與 MQ-5 氣體感測器組成。不同氣體成分在各感測器上的反應強度不盡相同,因此當氣味進入感測器陣列時,會形成一組多通道的數值組合。這些數值組合是後續建立氣味辨識模型的重要基礎。
所以理論上不同精油揮發後所形成的氣體組成若存在差異,就可能在感測器陣列上呈現不同的反應模式,進而可以分出不同的精油氣體……囉!?
本篇目標
為了在實驗過程中更容易觀察不同氣味的變化,本篇先完成一個簡易的網頁顯示介面,將電子鼻的原始數據即時呈現在瀏覽器上。
本篇的實作目標如下:
- 讓 Raspberry Pi Pico W 建立簡易 HTTP Server(微型網頁伺服器)
- 將感測器數值即時顯示在網頁
- 觀察不同精油氣體的原始氣體數據(Raw Data)
為了在實驗時,容易觀察不同的精油氣體原始數值,所以將精油氣體原始數值顯示在網頁中,透過這些數據,我們可以隨時觀察不同精油氣體的變化趨勢。
顯示的氣體數據
前面提到,電子鼻系統的感測器由多通道氣體感測器與 MQ-5 氣體感測器組成。
- 其中,多通道氣體感測器模組可提供多個氣體通道指標,例如:
- 💨一氧化碳(CO)
- 💨二氧化氮(NO2)
- 💨乙醇(C2H5OH)
- 💨揮發性有機化合物(VOC)
- 另外,MQ-5 氣體感測器主要對可燃性氣體有反應(例如:瓦斯),在本實驗中作為額外的感測通道使用。
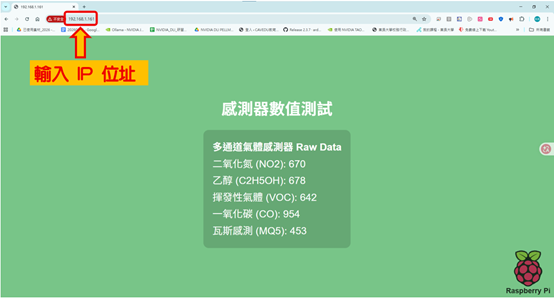
在本實驗中,電子鼻會輸出上述幾個氣體通道的原始數值,如下圖所示:
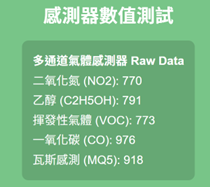
如果將不同精油氣體放在電子鼻做偵測,就可以觀察到數值會出現不同的變化模式,
這些差異可作為後續進行氣味分類(Smell Classification)的重要基礎。
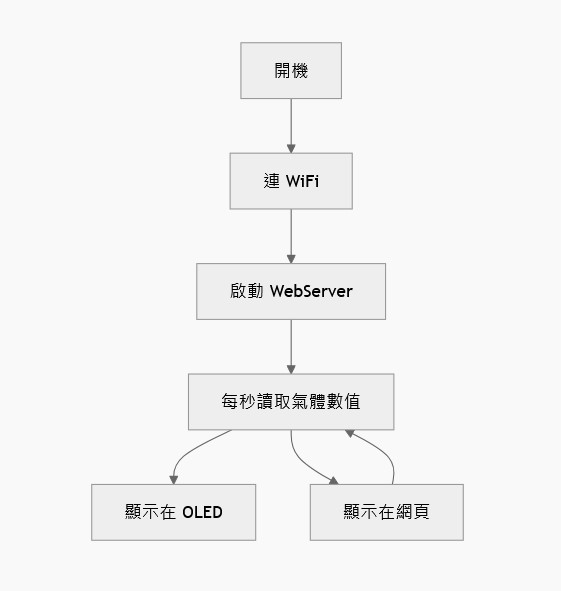
程式流程圖
系統開機後,首先完成感測器、OLED 與 WiFi 初始化,並啟動 WebServer。進入主迴圈後,系統以固定取樣頻率(10Hz)讀取多通道氣體感測器與 MQ-5 的 Raw Data,同步將數據輸出至序列埠 Serial(CSV 格式)、OLED 螢幕,以及網頁介面,以實現即時監看功能。
上傳程式碼
了解前面的原理後,為了要將氣體通道指標顯示在網頁,筆者提供這個專案的程式碼,讀者將程式碼下載後,上傳到 Rasbperry PI Pico W 即可,
程式碼傳送門(按我下載)
#include <Arduino.h>
#include <Wire.h>
#include <WiFi.h>
#include <WebServer.h>
#include <Multichannel_Gas_GMXXX.h>
#include <U8g2lib.h>

// ========= WiFi =========
const char* ssid     = "你的SSID";
const char* password = "你的密碼 ";


WebServer server(80);
String ipAddress = "";

// ========= OLED =========
U8G2_SSD1306_128X64_NONAME_F_HW_I2C u8g2(U8G2_R0, U8X8_PIN_NONE);

// ========= Gas Sensor =========
#define GAS_I2C_ADDR 0x08
GAS_GMXXX<TwoWire> gas;

// ========= MQ-5 =========
#define MQ5_PIN 26   // ADC0 (0~4095)

// ========= Sample Rate =========
const float SAMPLE_RATE_HZ = 10.0f;
unsigned long lastMs = 0;
unsigned long dtMs   = (unsigned long)(1000.0f / SAMPLE_RATE_HZ);

// ========= Raw Data =========
int v_no2    = 0;
int v_c2h5oh = 0;
int v_voc    = 0;
int v_co     = 0;
int v_mq5    = 0;

// ========= HTML =========
String generateHTML() {
  String html = F("<!DOCTYPE html><html><head>");
  html += F("<meta http-equiv='refresh' content='1'>");
  html += F("<meta charset='UTF-8'>");

  html += F("<style>");
  html += F("html, body { height: 100%; margin: 0; background: #78c588; font-family: sans-serif; }");

  // 中央置中版面
  html += F("#content { display: flex; flex-direction: column; justify-content: center; align-items: center; height: 100vh; position: relative; }");
  html += F("#main_text { text-align: center; z-index: 10; }");

  // 右下角 Raspberry Pi 圖示
  html += F("#icon_raspi { position: absolute; bottom: 10px; right: 10px; display: flex; flex-direction: column; align-items: center; opacity: 0.8; }");
  html += F("#icon_img { width: clamp(40px, 8vw, 80px); }");
  html += F("#icon_text { font-size: clamp(12px, 1.5vw, 20px); color: #000; }");

  // 字體與卡片樣式
  html += F("#title { font-size: clamp(26px, 5vw, 44px); color: #fff; margin-bottom: 20px; }");
  html += F("#detail_div { margin-top: 10px; color: #fff; font-size: clamp(18px, 3vw, 28px); text-align: left; display: inline-block; background: rgba(0,0,0,0.15); padding: 25px; border-radius: 15px; }");
  html += F("ul { list-style-type: none; padding: 0; margin: 0; }");
  html += F("li { margin: 6px 0; }");

  html += F("</style></head><body>");

  html += F("<div id='content'>");

  // 右下角圖示
  html += F("<div id='icon_raspi'>");
  html += F("<img id='icon_img' src='https://upload.wikimedia.org/wikipedia/de/c/cb/Raspberry_Pi_Logo.svg'>");
  html += F("<b id='icon_text'>Raspberry Pi</b>");
  html += F("</div>");

  // 主內容
  html += F("<div id='main_text'>");
  html += F("<h1 id='title'>感測器數值測試</h1>");

  html += F("<div id='detail_div'>");
  html += F("<strong>多通道氣體感測器 Raw Data</strong><ul>");
  html += F("<li>二氧化氮 (NO2): ");     html += String(v_no2);  html += F("</li>");
  html += F("<li>乙醇 (C2H5OH): ");      html += String(v_c2h5oh); html += F("</li>");
  html += F("<li>揮發性氣體 (VOC): ");   html += String(v_voc);  html += F("</li>");
  html += F("<li>一氧化碳 (CO): ");      html += String(v_co);   html += F("</li>");
  html += F("<li>瓦斯感測 (MQ5): ");     html += String(v_mq5);  html += F("</li>");
  html += F("</ul></div>");

  html += F("</div>"); // main_text
  html += F("</div>"); // content
  html += F("</body></html>");

  return html;
}


void handleRoot() {
  server.send(200, "text/html", generateHTML());
}

// ================= SETUP =================
void setup() {
  Serial.begin(115200);
  delay(1500);

  analogReadResolution(12);

  Wire.setClock(100000);
  Wire.begin();
  gas.begin(Wire, GAS_I2C_ADDR);

  pinMode(MQ5_PIN, INPUT);

  // OLED
  u8g2.begin();
  u8g2.enableUTF8Print();
  u8g2.setFont(u8g2_font_unifont_t_chinese1);
  u8g2.clearBuffer();
  u8g2.drawUTF8(0, 16, "WIFI Connecting...");
  u8g2.sendBuffer();

  // WiFi
  WiFi.mode(WIFI_STA);
  WiFi.begin(ssid, password);
  while (WiFi.status() != WL_CONNECTED) {
    delay(500);
  }

  // 連線成功
  Serial.println("\nWiFi Connected!");
  ipAddress = WiFi.localIP().toString();
  Serial.print("IP: ");
  Serial.println(ipAddress);


  // 顯示 IP 在 OLED
  u8g2.clearBuffer();
  u8g2.drawUTF8(0, 16, "WiFi OK");
  u8g2.setCursor(0, 32);
  u8g2.print("IP:");
  u8g2.print(ipAddress);
  u8g2.sendBuffer();


  // WebServer
  server.on("/", handleRoot);
  server.begin();

  // CSV Header
  Serial.println("NO2,C2H5OH,VOC,CO,MQ5");

  lastMs = millis();
}

// ================= LOOP =================
void loop() {
  unsigned long now = millis();
  if (now - lastMs < dtMs) {
    server.handleClient();
    return;
  }
  lastMs = now;

  // Read Grove Gas Sensor
  v_no2    = max(0, gas.measure_NO2());
  v_c2h5oh = max(0, gas.measure_C2H5OH());
  v_voc    = max(0, gas.measure_VOC());
  v_co     = max(0, gas.measure_CO());

  // Read MQ-5
  v_mq5 = analogRead(MQ5_PIN);
  if (v_mq5 < 0) v_mq5 = 0;
  if (v_mq5 > 4095) v_mq5 = 4095;

  // Serial CSV
  Serial.print(v_no2);    Serial.print(",");
  Serial.print(v_c2h5oh); Serial.print(",");
  Serial.print(v_voc);    Serial.print(",");
  Serial.print(v_co);     Serial.print(",");
  Serial.println(v_mq5);

  // OLED
  u8g2.clearBuffer();
  u8g2.setCursor(0, 14); u8g2.print("IP:"); u8g2.print(ipAddress);
  u8g2.setCursor(0, 28); u8g2.print("NO2:"); u8g2.print(v_no2);
  u8g2.setCursor(0, 40); u8g2.print("C2H5OH:"); u8g2.print(v_c2h5oh);
  u8g2.setCursor(0, 52); u8g2.print("VOC:"); u8g2.print(v_voc);
  u8g2.setCursor(70, 52);u8g2.print("MQ5:"); u8g2.print(v_mq5);
  u8g2.sendBuffer();

  server.handleClient();
}
實際結果展示
燒錄到Raspberry Pi Pico W 成功後, OLED 螢幕會顯示網址,如下圖所示。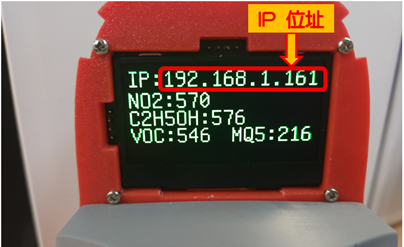
在瀏覽器中輸入網址後,網頁就成功顯示所有感測器數值
影片成果展示
本篇完成了電子鼻系統的網頁即時顯示功能,能夠將多通道氣體感測器與 MQ-5 的原始數據(Raw Data)即時呈現在瀏覽器中,方便在實驗過程中觀察不同氣味的變化情形。
以下為三種精油(檜木、甜橘、薄荷)進行測試時的實驗影片:
檜木精油
甜橘精油
薄荷精油
結論
本次實驗除了觀察不同精油的 Raw Data 變化,不過在目前的資料條件下,精油數值太接近,結果仍不理想,
這代表現階段的資料品質與特徵資訊,仍不足以有效區分不同精油,而非單純更換模型即可解決。換句話說,問題的核心並不只在模型選擇,而是在前端資料蒐集與特徵設計仍有優化空間。
因此,本篇先聚焦於電子鼻系統建置、網頁即時顯示,以及多通道感測數據觀察,並將精油分類視為後續延伸研究方向。
雖然本次尚未完成穩定的精油辨識,但已完成電子鼻實作中相當關鍵的一步:建立可用的資料觀察與記錄基礎。這也為後續的資料前處理、特徵萃取與分類模型優化奠定了實驗基礎。
相關文章
Pico W × Edge Impulse:打造嵌入式電子鼻系統Part1— 系統建置篇
Pico W × Edge Impulse:打造嵌入式電子舌系統Part1 — 系統建置篇
【tinyML系列專題】使用 wio terminal 與氣體感測器收集咖啡氣味資料!
立即洽詢與報名
CAVEDU 教育團隊 (翰尼斯企業) 是您最專業的技術夥伴。
歡迎洽詢企業包班、技術顧問與客製化課程規劃:
由 NVIDIA 白金級大使領軍,CAVEDU 團隊為您提供與產業接軌的 Physical AI 教學方案。