


| 作者/攝影 | 曾吉弘 |
| 時間 | 3小時 |
| 難度 |
★★★★★ |
| 材料表 |
|
請參閱 [LattePanda教學] lattepanda + Azure #1 環境建置] 本文將介紹如何上傳類比資料(電位計)到Azure IoT hub,並可在 Visual Studio 與 Power BI 中檢視資料。
環境建置
硬體
在此有兩種做法,使用 Lattepanda 感測器套件 中的 Analog Rotation Potentiometer sensor 接在 Lattepanda 上的 Gravity 4號接腳上,請參考下圖:

或採用一般的電位計,中央腳位接到 Lattepanda 的A0腳位,另外兩隻腳一端接 5V,一端接GND即可,完成如下圖:

Lattepanda Arduino端
請上傳StandardFirmata 到 Lattepanda 的 Arduino 晶片中,別忘了 Board 要選 Arduino Leonardo,COM port 請根據 Windows裝置管理員為準,本程式中為 COM4。

Lattepanda Windows端:
請用 git client 下載 azure iot sdk,請安裝 Windows 版 git 工具之後在 powershell (cmd + r 之後搜尋 powershell )下執行以下指令把檔案下載到 lattepanda。在此我們預設的路徑皆為 C:\Users\Lattepanda:
git clone https://github.com/Azure/azure-iot-sdks.git
完成之後在其中的 /build 資料夾中找到 dev-setup.cmd,點擊兩下即可開始安裝程序。安裝完成之後可在同路徑下看到多了一個 node_modules 資料夾。
安裝Node.js所需套件
請在powershell 中執行以下指令,johnny-five serialport 這兩個是我們在 app.js 中會用到的套件:
npm install johnny-five serialport
建立Azure storage
Azure Storage
Azure Storage 是微軟所提供的雲端儲存方案,提供不同客戶在耐用性、取得性以及規模彈性上的各種需求,大到科學、金融用的數百TB以上資料,小到個人網站,都可在此完成。
請登入Azure portal,New -> Storage -> Storage account。並根據以下參數來建立 Storage account:
| Name:自行取一個名稱,在此為 cavedu
Storage service ecryption: Disabled Subscription: Free Trial (根據您帳號而定) Resource group: Create new 或 USe existing 都可以,在此我建立一個新的: cavedu location: 根據您所在地,在此我選 East Asia |
 |
建立完成後會看到以下畫面,請注意右下角的 URL 要記起來,後續與 Power BI 連接時會用到
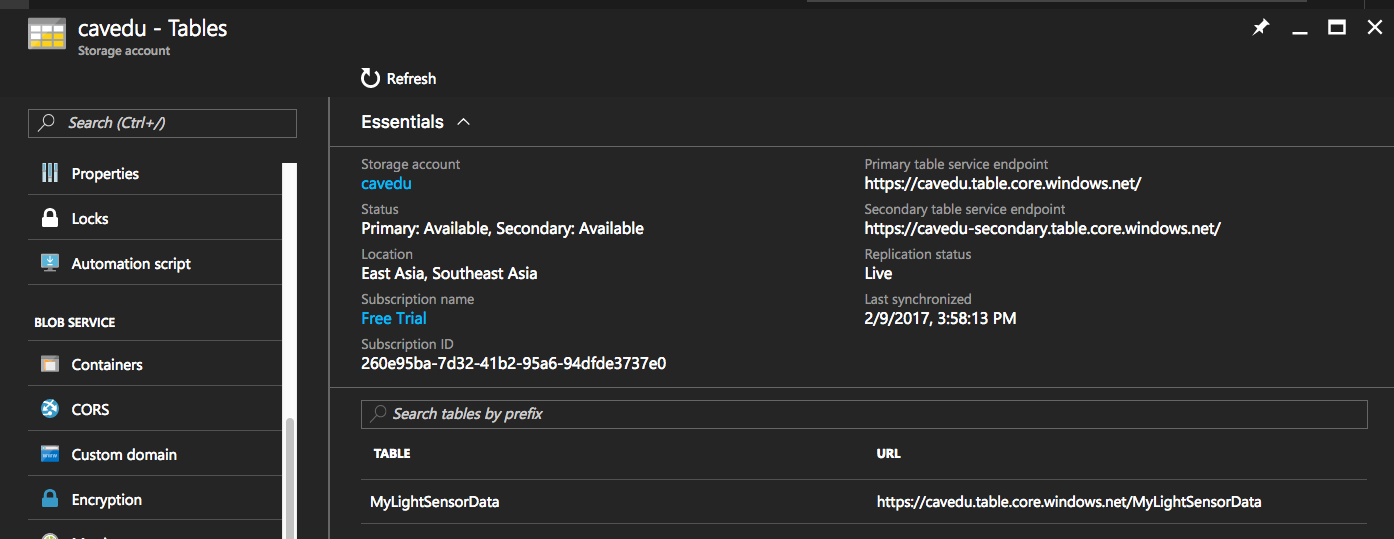
Settings / Access Keys 下面的 key1 / key2也記起來,請任選一組輸入在後續要執行的程式中。

程式說明
Lattepanda Arduino端
請確認 StandardFirmata 程式已經上傳 Lattepanda 的 Arduino 晶片並執行,如果不確定的話可以再上傳一次或按下板子上的 Reset 鈕讓 Arduino 晶片重新執行程式。Arduino端程式一定要先執行,後續 app.js 去呼叫 Arduino COM port 時才可正常運作,否則就會顯示錯誤訊息。
Lattepanda Windows端
請開啟power shell,切換到您解壓縮 azure-iot-sdk的資料夾下,(我們的路徑是 C:\Users\lattepanda),使用您喜歡的編輯程式建立一個名為 app.js 的檔案並貼入以下內容。您只要修改 accountName、accountKey與tableName這三筆資料即可,如下圖:

app.js
[pastacode lang=”java” manual=”var%20azure%20%3D%20require(‘azure-storage’)%3B%0Avar%20five%20%3D%20require(‘johnny-five’)%3B%0A%0Avar%20accountName%20%3D%20’XXX’%3B%20%2F%2F%20Enter%20your%20Azure%20storage%20account%20name%0Avar%20accountKey%20%3D%20’OOO’%3B%20%2F%2F%20Enter%20your%20Azure%20storage%20account%20key%0Avar%20tableName%20%3D%20’MyLightSensorData’%3B%20%2F%2F%20Name%20of%20your%20table%20to%20store%20the%20light%20sensor%20data%0A%0Avar%20arduinoPort%20%3D%20’COM4’%3B%2F%2F%20Enter%20your%20Arduino%20Port%0A%0Avar%20tableService%20%3D%20azure.createTableService(accountName%2C%20accountKey)%3B%0A%0Aif%20(CreateTable())%20%7B%0AInitializeBoard()%3B%0A%7D%0A%0A%2F%2F%20Create%20a%20table%20in%20Azure%20storage%0Afunction%20CreateTable()%20%7B%0AtableService.createTableIfNotExists(tableName%2C%20function%20(error%2C%20result%2C%20response)%20%7B%0A%20%20if%20(error)%20%7B%0A%20%20%20%20console.log(error)%3B%0A%20%20%20%20return%20false%3B%0A%20%20%7D%0A%7D)%3B%0Areturn%20true%3B%0A%7D%0A%0A%2F%2F%20Initialize%20the%20Arduino%20board%20with%20Johnny-Five%0Afunction%20InitializeBoard()%20%7B%0Avar%20board%20%3D%20new%20five.Board(%7B%20port%3A%20arduinoPort%20%7D)%3B%0A%0Aboard.on(‘ready’%2C%20function%20()%20%7B%0A%20%20lightSensor%20%3D%20new%20five.Sensor(%7B%0A%20%20%20%20pin%3A%20%22A0%22%2C%0A%20%20%20%20freq%3A%2030000%20%2F%2F%20%E4%B8%8A%E5%82%B3%E9%96%93%E9%9A%9430%E7%A7%92%0A%20%20%7D)%3B%0A%0A%20%20lightSensor.on(‘change’%2C%20function%20()%20%7B%0A%20%20%20%20InsertValue(this.value)%3B%0A%20%20%7D)%3B%0A%7D)%3B%0A%7D%0A%0Afunction%20InsertValue(value)%20%7B%0Aconsole.log(‘Value%20to%20insert%3A%20’%20%2B%20value)%3B%0A%0A%2F%2F%E5%BB%BA%E7%AB%8B%E4%B8%80%E5%80%8B%E5%AF%A6%E9%AB%94%EF%BC%8C%E5%B0%87%E5%85%89%E6%84%9F%E6%B8%AC%E5%99%A8%E5%80%BC%E8%88%87%E6%97%A5%E6%9C%9F%E5%AD%98%E5%9C%A8%E8%B3%87%E6%96%99%E8%A1%A8%E4%B8%AD%0Avar%20entGen%20%3D%20azure.TableUtilities.entityGenerator%3B%0Avar%20entity%20%3D%20%7B%0A%20%20PartitionKey%3A%20entGen.String(‘Light’)%2C%0A%20%20RowKey%3A%20entGen.String(String(Date.now()))%2C%0A%20%20intValue%3A%20entGen.Int32(value)%2C%0A%20%20dateValue%3A%20entGen.DateTime(new%20Date().toISOString())%2C%0A%7D%3B%0A%0A%2F%2F%E5%B0%87%E5%AF%A6%E9%AB%94%E6%8F%92%E5%85%A5Azure%20storage%20table%0AtableService.insertEntity(tableName%2C%20entity%2C%20function%20(error%2C%20result%2C%20response)%20%7B%0A%20%20if%20(error)%20%7B%0A%20%20%20%20console.log(error)%3B%0A%20%20%7D%0A%7D)%3B%0A%7D%0A” message=”” highlight=”” provider=”manual”/]
執行與檢視資料
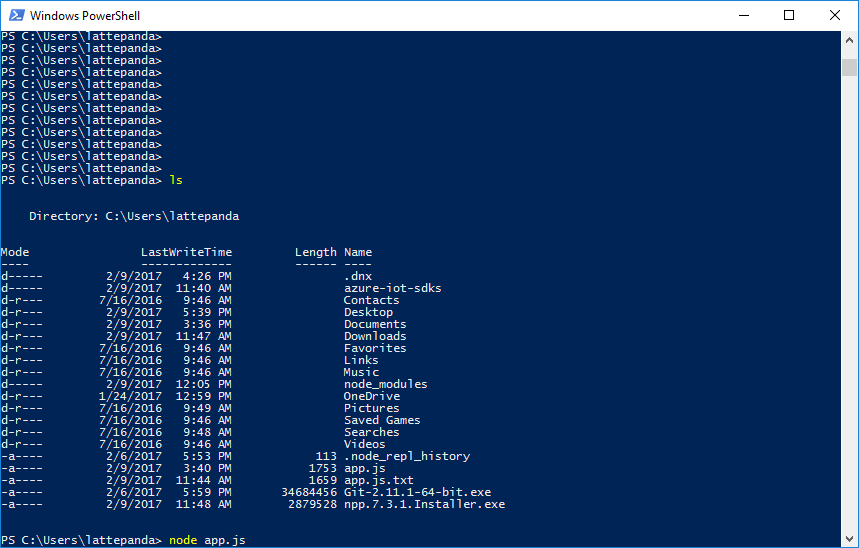
請在powershell 下切換到您的您解壓縮 azure-iot-sdk的資料夾下(我們的路徑是 C:\Users\lattepanda),執行以下指令來執行程式。 /XX 資料夾之後執行以下指令:
node app.js
即可看到以下畫面,由console中可看到程式已經陸續上傳多筆資料了。後續我們會在 VisualStudio 中檢視您所上傳的資料。

回到 Azure portal 的 storage acount,在左側選單中找到 Activity log選項,可以看到方才執行的動作。

在 Visual Studio中檢視資料
開啟VisualStudio時,請點選Connect to Azure並用您的Azure帳號登入。
在工具列的 View 中,點選 Server Explorer

登入您的 Azure 帳號之後,即可在 Storage 選項中找到您所建立的 Table 名稱(MyLightSensorData),點選即可看到資料喔!

在PowerBI中檢視資料( 選用)
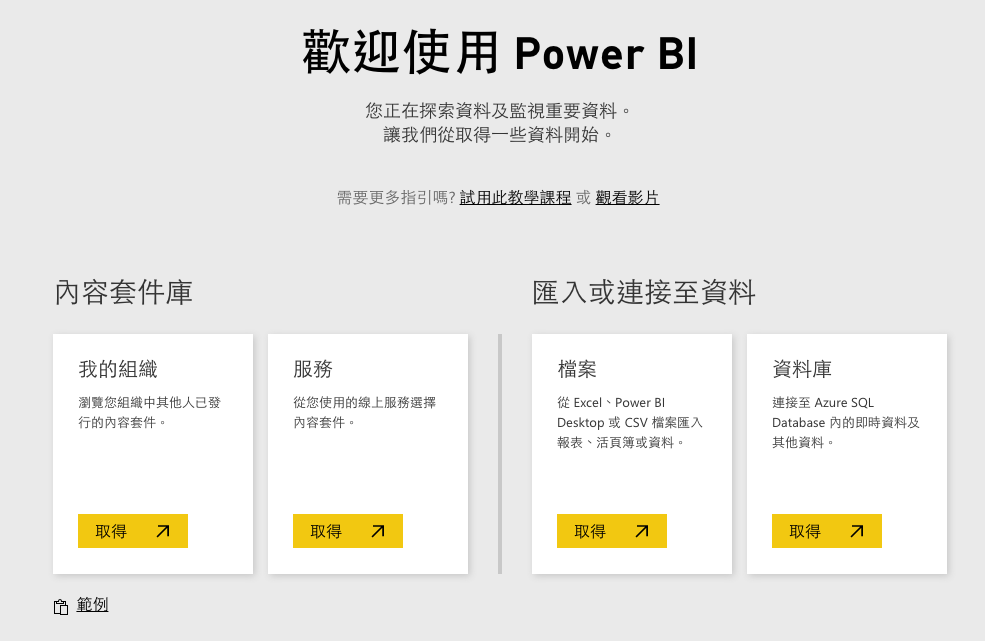
Power BI 是微軟提供的商務分析工具套件,可用來分析資料及共用深入資訊。透過自行定義或預設的儀表板模組,使用者可以匯入、分析並取得資料中的重要資訊,協助決策。
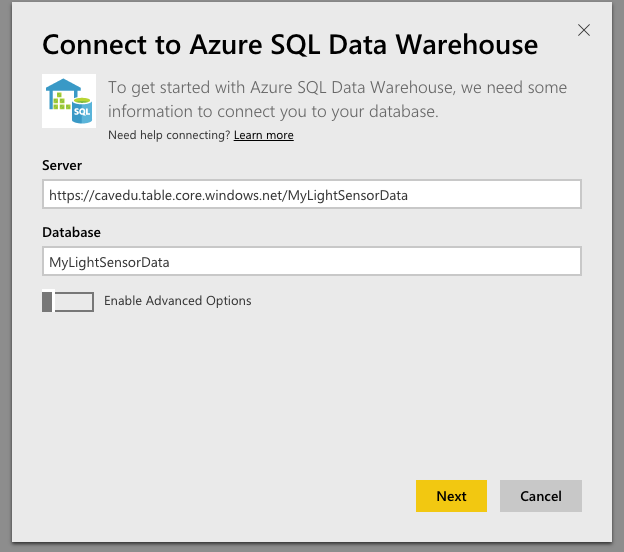
登入Power BI 之後,您可以在此檢視 Azure storage 中的資料,就是上述我們所執行的程式結果。請點選下圖的 [取得 資料庫],並登入您的 Azure 帳號再輸入您的 server 路徑以及資料庫名稱,完成之後即可看到同一筆資料了


參考資料:
- http://www.lattepanda.com/docs/#Send_light_sensor_data_to_Azure_storage
- https://developer.microsoft.com/en-us/windows/iot/samples/azuredatauploader
- 建議使用powershell,開啟方法:win+R快捷見,然後輸入powershell就可以開啟了
- 建議使用git,下載網址:https://git-scm.com/download/win
- 打開powershell,cd 到你想裝的地方,預設是直接在使用者的家目錄,然後輸入git clone https://github.com/Azure/azure-iot-sdks.git
- 根據教學文它需要把其中node的submodule一併裝進來,所以輸入:git submodule update –init — node
這樣就搞定了
相關文章:
- LattePanda系列文章
- [LattePanda教學] lattepanda + Azure #1 環境建置
- [LattePanda拿鐵熊貓 ] 簡單使用LettePanda遠端遙控3D列印機不求人
- LattePanda 拿鐵熊貓教學:Arduino與Visual Studio環境設定
- LattePanda 拿鐵熊貓教學#2:讀取按鈕狀態,使用Visual Studio
- LattePanda 拿鐵熊貓教學#1:LED 閃爍,使用Visual Studio


