LattePanda 拿鐵熊貓教學#1:LED 閃爍,使用Visual Studio
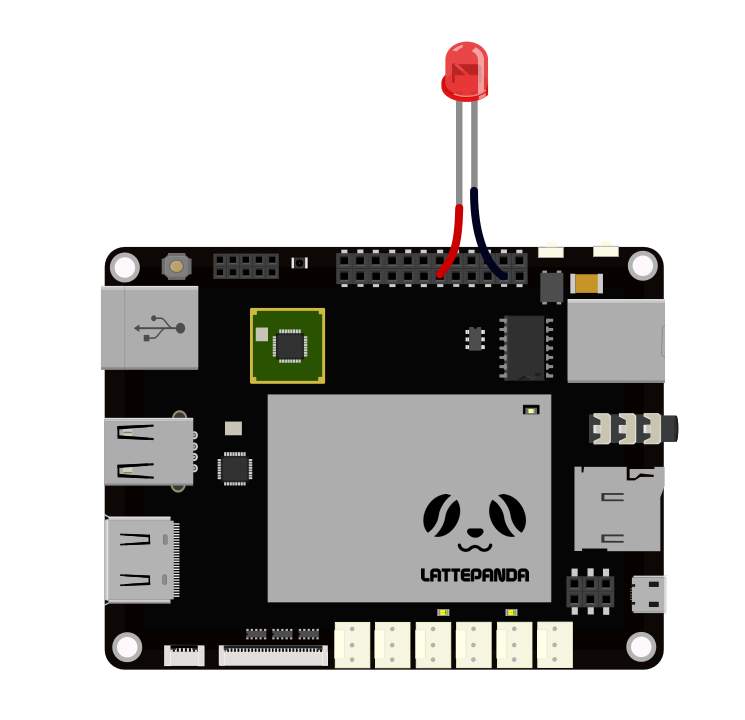
本範例將在 Lattepanda 上使用 Visual studio 來編寫程式控制其腳位,就從 LED 閃爍開始吧。本範例根據 LattePanda官方範例實作而來:http://www.lattepanda.com/docs/
延伸閱讀:
- LattePanda 開發板 x 1
- LED x 1
- LED 直接插入13號腳位(長)與 GND(短)


Lattepanda 腳位配置
- 請在 Latte Panda 中的Visual Studio 中建立一個新專案
- 您需要匯入 LattePanda.Firmata class 函式庫才能順利執行本專案
- 程式碼如下:
using System;
using System.Collections.Generic;
using System.Linq;
using System.Text;
using System.Threading.Tasks;
using System.Threading;
using LattePanda.Firmata;
namespace blinkYourBoard//project name
{
class Program
{
    static Arduino arduino = new Arduino();//create an instance and initialize with the default parameters
    static void Main(string[] args)
    {
      arduino.pinMode(13, Arduino.OUTPUT);//Set the digital pin 13 as output
      while (true)
      {
        // ==== set the led on or off
        arduino.digitalWrite(13, Arduino.HIGH);//set the LED on
        Thread.Sleep(1000);//delay a seconds
        arduino.digitalWrite(13, Arduino.LOW);//set the LED off
        Thread.Sleep(1000);//delay a seconds
      }
    }
}
}
- 請點選 Visual Studio 中的Debug按鈕,LED就會開始閃動
本文發表於lattepanda 拿鐵熊貓,並標記lattepanda、Raspberry Pi 3、拿鐵熊貓、物聯網。



留言 💬 (0)
還沒有留言,來當第一個。