[App Inventor 物聯網應用-藍牙4.0 BLE] Lesson 4 – 機器手臂
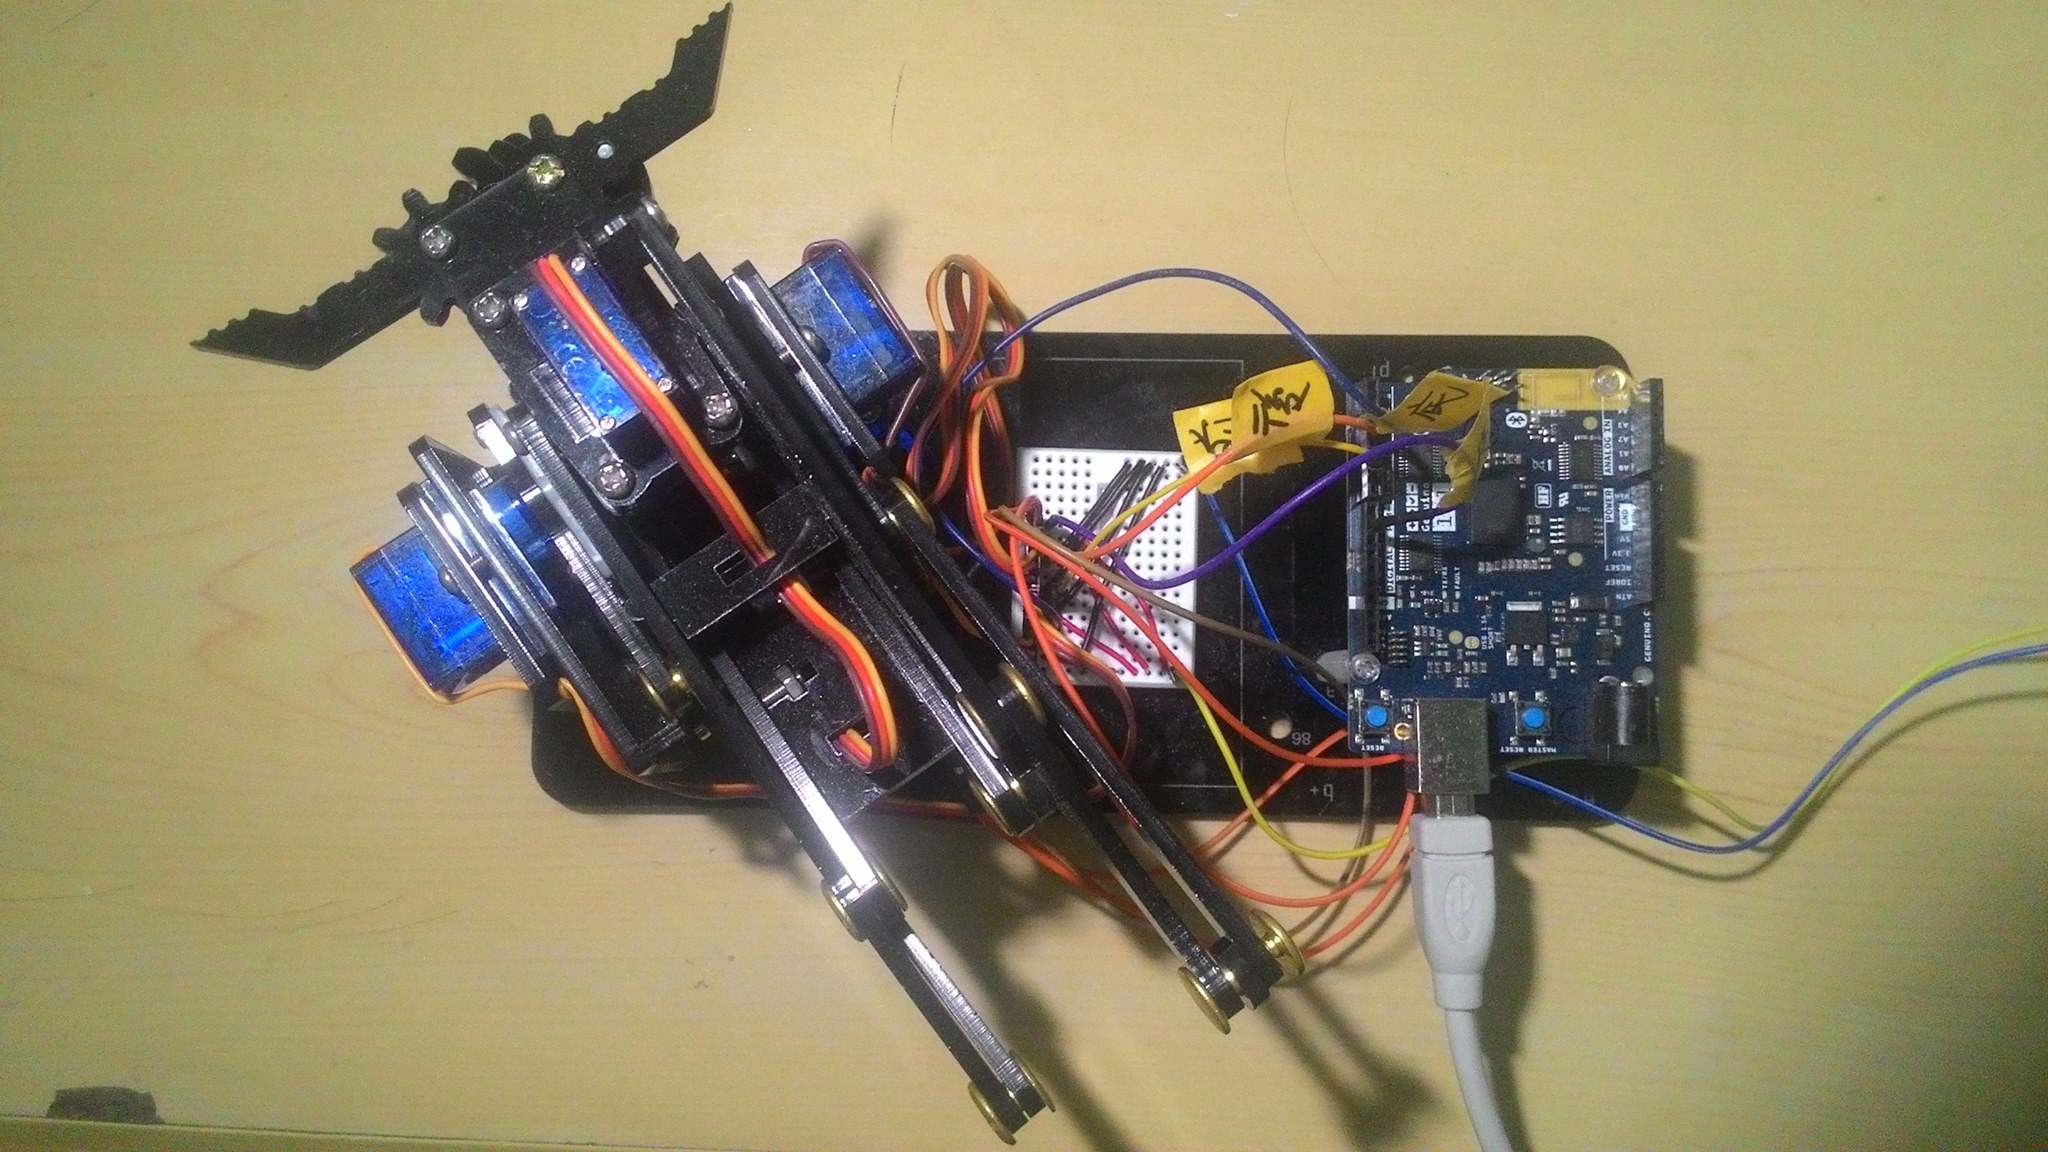
本篇文章示範如何使用 App Inventor 之 BLE (Bluetooth Low Energy) 元件控制 Arduino 101 機器手臂 (架構比照 mearm,為四個自由度之桌上型機器手臂)。請注意,BLE元件尚未正式發布,請用 http://ble-test.apinventor.mit.edu 這個測試用伺服器來測試。
相關文章請點我
| [Make雜誌國際中文版]Arduino 101 介紹 | Arduino 101 BLE 第二課 LED呼吸燈(PWM) |
硬體架構
- Arduino 101
- Android 手機
- MeArm 或任何類似架構的四軸裝上型機器手臂,請參考我們的說明
App Inventor 程式說明
Designer頁面
使用到的元件除了 BLE 之外,其他幾乎都是 Button / Label 等基礎元件。概念上就是一大堆按鈕, 您可以自由安排版面的配置,本app操作的概念是按下某個按鈕就會發送訊號讓 Arduino 機器手臂執行某個動作,只要放開按鈕就會馬上停止,這是使用 Button 的 TouchUp / TouchDown 事件。

Blocks頁面
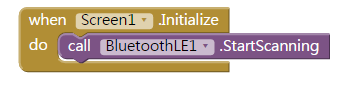
初始化:程式啟動時,要求 BLE 元件進行掃描。
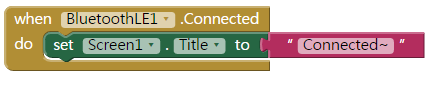
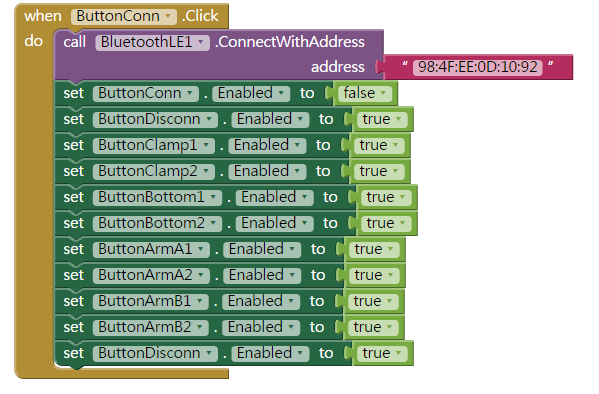
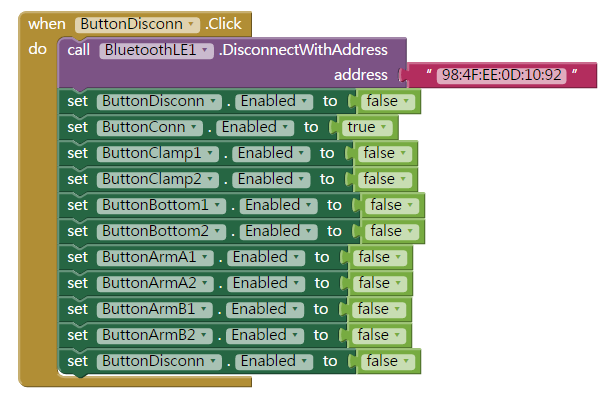
連線與斷線:按下連線按鈕時,對指定 BLE 裝置 (Arduino 101) 發起連線,成功的話會在 Screen1.Title 顯示相關訊息。斷線時則執行相反的操作,會讓畫面上所有的按鈕變成不可操作(Enabled = false)
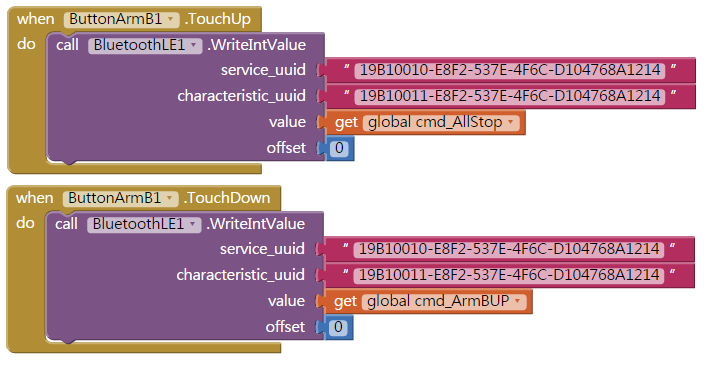
按下按鈕:在此只介紹 ButtonArmB1 (伸出前臂的這個按鈕),請注意我們在此使用按鈕的 TouchUp 與 Touchdown 等兩個事件。畫面上一共有八個按鈕,搭配各自的TouchUp 與 Touchdown 等事件,畫面非常滿啊!
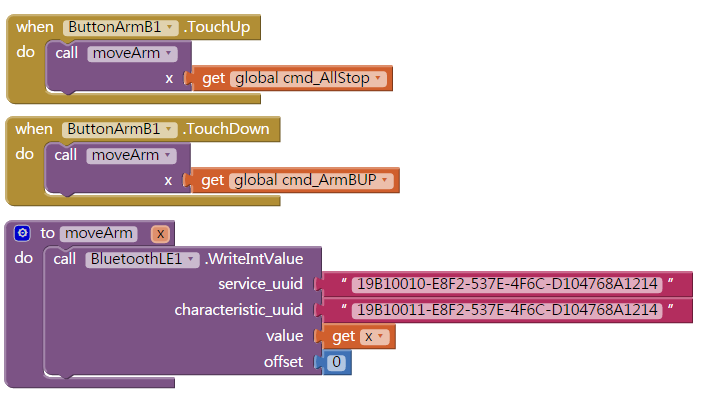
實際上這樣寫法也太冗長了,您可以使用副程式來管理,其實只是送入不同的參數而已,很容易就可以讓程式變得更清爽喔!
Arduino 101 code
#include <Servo.h>
#include <SoftwareSerial.h>
#include <CurieBLE.h>
Servo Bottom;
Servo Clamp;
Servo ArmA;
Servo ArmB;
BLEPeripheral blePeripheral;
BLEService MeArm("19B10010-E8F2-537E-4F6C-D104768A1214");
BLEUnsignedIntCharacteristic readchar("19B10011-E8F2-537E-4F6C-D104768A1214", BLERead | BLEWrite | BLENotify);
#define Bottom_pin  3
#define Clamp_pin  9
#define ArmA_pin  5
#define ArmB_pin  6

#define Bottom_max  170
#define Bottom_min  0
#define Clamp_max  140
#define Clamp_min  50
#define ArmA_max  150
#define ArmA_min  50
#define ArmB_max  210
#define ArmB_min  120

int Clamp_pos = Clamp_max;
int Bottom_pos = (Bottom_max + Bottom_min)/2;
int ArmA_pos = ArmA_min;
int ArmB_pos = ArmB_max;
int delta = 10;

void setup() {
  Serial.begin(9600);
  blePeripheral.setLocalName("MeArm");
  blePeripheral.setAdvertisedServiceUuid(MeArm.uuid());
  blePeripheral.addAttribute(MeArm);
  blePeripheral.addAttribute(readchar);
  readchar.setValue(0);
  blePeripheral.begin();
  Init_Pin();
}

void loop() {
  BLECentral central = blePeripheral.central();
  if (central) {
    Serial.print("Connected to central: ");
    Serial.println(central.address());
    while(central.connected())
    {
       if(readchar.written())
       {
        Serial.println(readchar.value());
        switch (readchar.value()){
        case 1:
          Serial.println("Turn Left");
          stopp();
          delay(100);
          BottomLeft();
          delay(100);
          break;

        case 3:
          Serial.println("Turn Right");
          stopp();
          BottomRight();
          delay(100);
          break;

        case 8:
         Serial.println("Clamp Open");
         stopp();
         delay(100);
         ClampOpen();
         delay(100);
         break;

       case 5:
        Serial.println("Clamp Close");
        stopp();
        delay(100);
        ClampClose();
        delay(100);
        break;

      case 7:
        Serial.println("Arm A Up");
        stopp();
        delay(100);
        ArmAUp();
        delay(100);
        break;

      case 4:
        Serial.println("Arm A Down");
        stopp();
        delay(100);
        ArmADown();
        delay(100);
        break;

      case 9:
        Serial.println("Arm B Up");
        stopp();
        delay(100);
        ArmBUp();
        delay(100);
        break;

      case 6:
        Serial.println("Arm B Down");
        stopp();
        delay(100);
        ArmBDown();
        delay(100);
        break;
      case 0:
        Serial.println("Stop");
        stopp();
        delay(100);
      }
       }//if
    }//while
    Serial.print(F("Disconnected from central: "));
    Serial.println(central.address());
  }//if

}

void Init_Pin() {
  Bottom.attach(Bottom_pin);
  Clamp.attach(Clamp_pin);
  ArmA.attach(ArmA_pin);
  ArmB.attach(ArmB_pin);
}

void ClampOpen() {
  Clamp_pos = Clamp_min;
  Clamp.write(Clamp_pos);

}
void ClampClose() {
  Clamp_pos = Clamp_max;
  Clamp.write(Clamp_pos);

}

void BottomRight() {
  if(Bottom_pos - delta > Bottom_min)
    Bottom_pos -= delta;
  Bottom.write(Bottom_pos);

}
void BottomLeft() {
  if(Bottom_pos + delta < Bottom_max)
    Bottom_pos += delta;
  Bottom.write(Bottom_pos);

}

void ArmAUp() {
  if(ArmA_pos + delta < ArmA_max) ArmA_pos += delta; ArmA.write(ArmA_pos); } void ArmADown() { if(ArmA_pos - delta > ArmA_min)
    ArmA_pos -= delta;
  ArmA.write(ArmA_pos);
}

void ArmBUp() {
  if(ArmB_pos - delta > ArmB_min)
    ArmB_pos -= delta;
  ArmB.write(ArmB_pos);
}
void ArmBDown() {
  if(ArmB_pos + delta < ArmB_max)
    ArmB_pos += delta;
  ArmB.write(ArmB_pos);
}
void stopp() {
  Bottom.write(Bottom_pos);
  Clamp.write(Clamp_pos);
  ArmA.write(ArmA_pos);
  ArmB.write(ArmB_pos);
}
本文發表於MIT App Inventor,並標記ble、MIT App Inventor、物聯網。
留言 💬 (0)
還沒有留言,來當第一個。