


本文將介紹如何在 Raspberry Pi 上設定 TJBot 所需之硬體與軟體環境,並結合 IBM Bluemix 的 Sppech to text 服務打造一台能以語音指令控制LED的機器人。
機器人外殼組裝請參考:http://wp.me/p3T9Qk-5B1
| 作者/攝影 | 曾吉弘 |
| 時間 | 6小時(組裝、環境設定與編寫程式等) |
| 成本 | |
| 難度 | * * * * * * * |
| 材料表 |
|
1.Raspberry Pi設定
請燒錄最新的 Raspbian 作業系統讓 Raspberry Pi 開機,本文使用 Raspberry Pi 3,但經測試,Raspberry Pi 2 也可正常使用。
2.安裝所需套件
Raspberry Pi 連上網路之後,請依序在 Raspberry Pi 的 terminal 中執行以下指令:
- sudo apt-get update (更新可用軟體)
- sudo apt-get dist-upgrade (升級軟體)
- curl -sL https://deb.nodesource.com/setup_6.x | sudo -E bash –
- sudo apt-get install -y nodejs (安裝js)
- sudo apt-get install alsa-base alsa-utils (安裝alsa聲音程式)
- git clone https://github.com/ibmtjbot/tjbot.git (取得本專案之github source)
- cd tjbot/recipes/speech_to_text (切換到指定資料夾)
- npm install (安裝所需之npm套件與檔案)
- npm install onoff
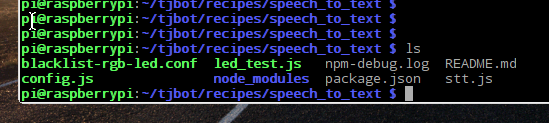
安裝完之後您的資料夾應該長這樣,有一個 /node_modules 資料夾,裡面是必要的函式庫:
3. Bluemix 設定
本段將介紹如何在 IBM Bluemix 上建立一個 Speech to text 服務。這個服務可以把我們對麥克風說的話轉成文字,讓Raspberry Pi 來辨識並執行對應動作
請註冊一個免費的 IBM bluemix 帳號

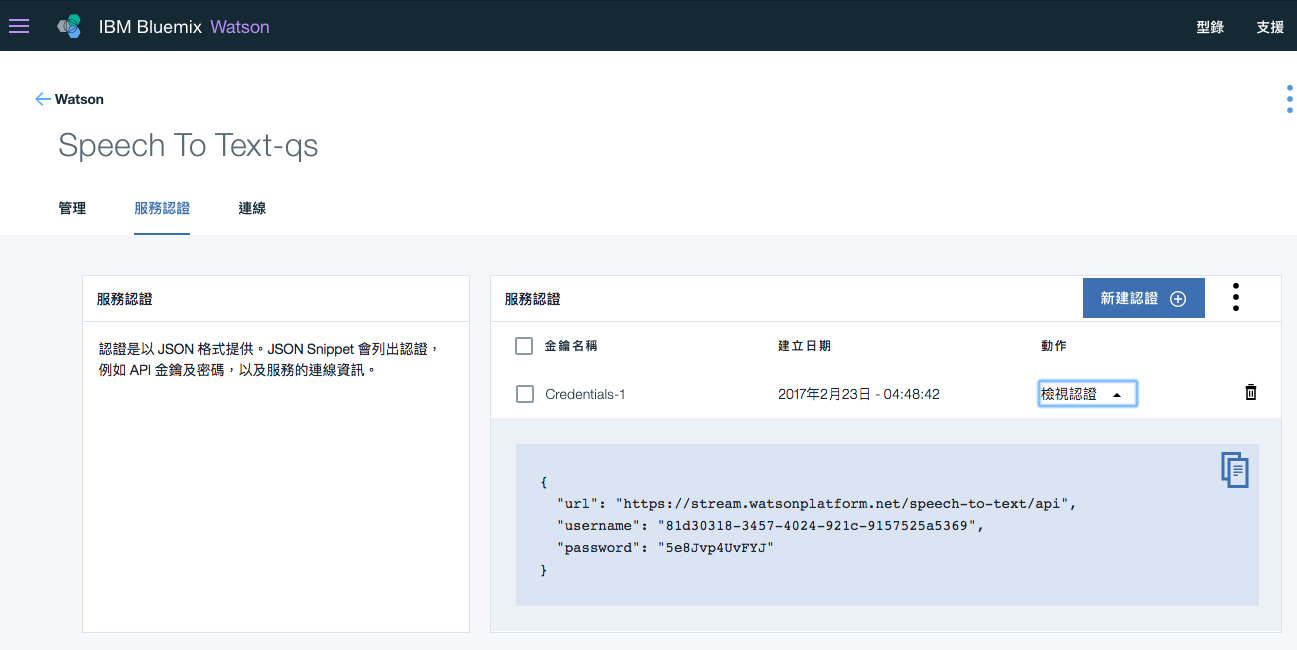
完成之後完成之後可於畫面左上角點選 [服務]/ [Watson] 即可看到我們所建立的 my-stt-service 服務。


4. 所需零件
所需硬體
- Raspberry Pi 3
- USB麥克風
- RGB LED (共陰)
- 跳線
- IBM TJBot (製作步驟請點我)
5. 硬體設定
請如下圖連接硬體,GND接到 Pi 的GND,LED則分別將正極接到Raspberry Pi 3 的GPIO14腳位(下圖右排,第4隻),負極則接到Raspberry Pi 3 的GND腳位(下圖右排,第3隻)

stt.js
程式大致上分成以下步驟:
- 設定Bluemix
在此須正確輸入您的 Bluemix 帳號密碼 - 設定麥克風
設定麥克風來取得您說話時的語音輸入檔。更多資訊請參考https://www.npmjs.com/package/mic - 把語音指令轉成文字
本步驟會把麥克風所錄製的聲音檔送到 “Watson Speech to Text”服務,並以”textStream” 回傳轉譯後的文字。可用的語系有以下,請由程式碼中的 var recognizeparams = {
content_type: ‘audio/l16; rate=44100; channels=2’,
model: ‘en-US_BroadbandModel’
};
來設定:
- zh-CN_NarrowbandModel
- zh-CN_BroadbandModel
- pt-BR_NarrowbandModel
- pt-BR_BroadbandModel
- ja-JP_NarrowbandModel
- ja-JP_BroadbandModel
- fr-FR_BroadbandModel
- es-ES_NarrowbandModel
- es-ES_BroadbandModel
- en-US_NarrowbandModel
- en-US_BroadbandModel (預設)
- en-UK_NarrowbandModel
- en-UK_BroadbandModel
- ar-AR_BroadbandModel
4.解析文字
在此會在解析後文字中找尋有沒有我們所設定的關鍵字,例如”on”、”off”與”light”。您可以說各種組合,例如”lights on”、”turn the lights on”或”turn on the lights”等等,在此我們使用的文字解析服務而非單純的字串辨識。您可由 parseText 函式中可看到定義關鍵字的方式,您可以根據這樣的架構加入更多關鍵字以及配對,一步步讓您的TJbot 更聰明。
[pastacode lang=”java” manual=”%2F************************************************************************%0A*%20Copyright%202016%20IBM%20Corp.%20All%20Rights%20Reserved.%0A*%0A*%20Watson%20Maker%20Kits%0A*%0A*%20This%20project%20is%20licensed%20under%20the%20Apache%20License%202.0%2C%20see%20LICENSE.*%0A*%0A************************************************************************%0A*%0A*%20Control%20a%20NeoPixel%20LED%20unit%20connected%20to%20a%20Raspberry%20Pi%20pin%20through%20voice%20commands%0A*%20Must%20run%20with%20root-level%20protection%0A*%20sudo%20node%20stt.js%0A%0A%20Based%20on%20example%20NeoPixel%20code%20by%20Jeremy%20Garff%20(jer%40jers.net)%0A%0A%20Follow%20the%20instructions%20in%20http%3A%2F%2Fwww.instructables.com%2Fid%2FUse-Your-Voice-to-Control-a-Light-With-Watson%2F%20to%0A%20get%20the%20system%20ready%20to%20run%20this%20code.%0A*%2F%0A%0A%2F%2Fmodified%20to%20single%20LED%20version%2C%20no%20NeoPixel%20needed%2C%20CAVEDU%2C%20Feb%202017%0A%0A%2F%2FSTEP1%0Avar%20watson%20%3D%20require(‘watson-developer-cloud’)%3B%0Avar%20config%20%3D%20require(‘.%2Fconfig’)%3B%20%20%2F%2F%20gets%20our%20username%20and%20passwords%20from%20the%20config.js%20files%0Avar%20speech_to_text%20%3D%20watson.speech_to_text(%7B%0A%20%20%20%20username%3A%20config.username%2C%0A%20%20%20%20password%3A%20config.password%2C%0A%20%20%20%20version%3A%20config.version%0A%7D)%3B%0A%0A%2F%2FSTEP2%0A%2F%2F%20Initiate%20Microphone%20Instance%20to%20Get%20audio%20samples%0Avar%20mic%20%3D%20require(‘mic’)%3B%0Avar%20micInstance%20%3D%20mic(%7B%20’rate’%3A%20’44100’%2C%20’channels’%3A%20’2’%2C%20’debug’%3A%20false%2C%20’exitOnSilence’%3A%206%20%7D)%3B%0Avar%20micInputStream%20%3D%20micInstance.getAudioStream()%3B%0A%0AmicInputStream.on(‘data’%2C%20function(data)%20%7B%0A%20%20%20%20%2F%2Fconsole.log(%22Recieved%20Input%20Stream%3A%20%22%20%2B%20data.length)%3B%0A%7D)%3B%0A%0AmicInputStream.on(‘error’%2C%20function(err)%20%7B%0A%20%20%20%20console.log(%22Error%20in%20Input%20Stream%3A%20%22%20%2B%20err)%3B%0A%7D)%3B%0A%0AmicInputStream.on(‘silence’%2C%20function()%20%7B%0A%20%20%20%20%2F%2F%20detect%20silence.%0A%7D)%3B%0AmicInstance.start()%3B%0Aconsole.log(%22TJBot%20is%20listening%2C%20you%20may%20speak%20now.%22)%3B%0A%0A%2F%2F%E8%A8%AD%E5%AE%9AGPIO%E4%BE%86%E6%8E%A7%E5%88%B6LED%E4%BA%AE%E6%BB%85%0Avar%20Gpio%20%3D%20require(‘onoff’).Gpio%3B%0Avar%20led%20%3D%20new%20Gpio(14%2C%20’out’)%3B%0A%0A%2F%2FSTEP3%0Avar%20recognizeparams%20%3D%20%7B%0A%20%20content_type%3A%20’audio%2Fl16%3B%20rate%3D44100%3B%20channels%3D2’%2C%0A%20%20model%3A%20’en-US_BroadbandModel’%20%20%2F%2F%E8%AB%8B%E7%94%B1%E6%AD%A4%E8%A8%AD%E5%AE%9A%E8%AA%9E%E7%B3%BB%0A%7D%3B%0Avar%20textStream%20%3D%20micInputStream.pipe(%0A%20%20%20%20speech_to_text.createRecognizeStream(recognizeparams)%0A)%3B%0A%0A%2F%2FSTEP4%0AtextStream.setEncoding(‘utf8’)%3B%0AtextStream.on(‘data’%2C%20function(str)%20%7B%0A%20%20%20%20console.log(‘%20%3D%3D%3D%3D%3D%20Speech%20to%20Text%20%3D%3D%3D%3D%3D%20%3A%20’%20%2B%20str)%3B%20%2F%2F%20print%20each%20text%20we%20receive%0A%20%20%20%20parseText(str)%3B%0A%7D)%3B%0A%0AtextStream.on(‘error’%2C%20function(err)%20%7B%0A%20%20console.log(‘%20%3D%3D%3D%20Watson%20Speech%20to%20Text%20%3A%20An%20Error%20has%20occurred%20%3D%3D%3D%3D%3D’)%20%3B%20%2F%2F%20handle%20errors%0A%20%20console.log(err)%20%3B%0A%20%20console.log(%22Press%20%3Cctrl%3E%2BC%20to%20exit.%22)%20%3B%0A%7D)%3B%0A%0Afunction%20parseText(str)%20%7B%0A%20%20%20%20if%20(containsText(str%2C%20%22light%22)%20%26%26%20containsText(str%2C%20%22on%22))%20%7B%0A%20%20%20%20%20%20%20%20console.log(%22Turn%20ON%22)%3B%0A%20%20%20%20%20%20%20%20led.writeSync(1)%0A%20%20%20%20%7D%20else%20if%20(containsText(str%2C%20%22light%22)%20%26%26%20containsText(str%2C%20%22off%22))%20%7B%0A%20%20%20%20%20%20%20%20console.log(%22Turn%20OFF%22)%3B%0A%20%20%20%20%20%20%20%20led.writeSync(0)%0A%20%20%20%20%7D%20else%20%7B%0A%20%20%20%20%20%20%20%20console.log(%22Please%20say%20something%20like%20turn%20on%2Foff%20the%20light%22)%3B%0A%20%20%20%20%7D%0A%7D%0A%0Afunction%20containsText(str%2C%20keyword)%20%7B%0A%20%20%20%20return%20str.indexOf(keyword)%20%3E%3D%200%3B%0A%7D%0A” message=”” highlight=”” provider=”manual”/]7. 測試與執行
請回到您的Pi,把上述程式碼中的 username 與 password 改成您個人的 Bluemix 帳號密碼即可。請在 terminal 中輸入以下指令即可執行本程式:
sudo node stt.js
請對您的 TJBot 說話吧,只要一句話中包含了關鍵字”on”與”light”,就會亮燈,如果包含關鍵字”off”與”light”則會熄燈。因此您可以說 “light on” 或是 “turn on the light” 都是可以的。
如果無法辨識關鍵字會提示您相關的關鍵字。從 parseText 函式中可看到定義關鍵字的方式,您可以根據這樣的架構加入更多關鍵字以及配對,讓您的TJBot 更聰明喔!
參考資料:
http://www.instructables.com/id/Use-Your-Voice-to-Control-a-Light-With-Watson/
相關文章:


