[App Inventor 物聯網應用-藍牙4.0 BLE] Lesson 1 - LED 閃爍
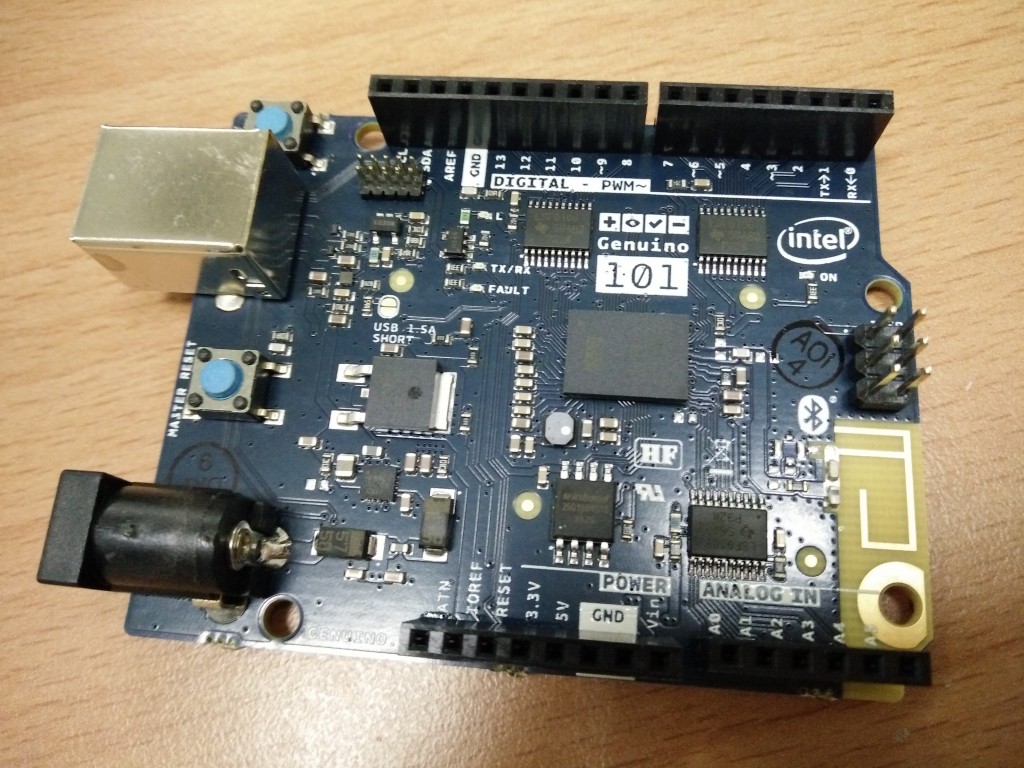
話說從 MIT 回來之後一樣沒閒著,今天要介紹的是還沒正式公布的秘辛 - App Inventor 的 BLE (Bluetooth Low Energy) 元件。請用 http://ble-test.apinventor.mit.edu 這個測試用伺服器來測試,當然您得先買一片 Arduino 101才行
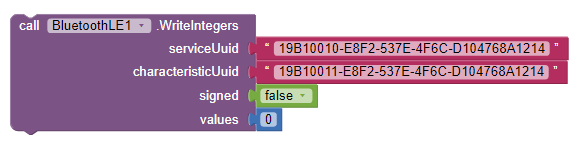
2019/08 updatehttp://ble-test.apinventor.mit.edu 伺服器已關閉,請直接匯入 BLE extension 到 MIT AI2 正式伺服器。 請改用MIT App Inventor團隊於 2018/11/24 release 的 BLE extension,並改用 WriteIntegers 指令即可。由下圖可看到可透過 signed 欄位指定為有號數或無號數。
|
MIT App Inventor 之後會使用 Arduino 101 作為物聯網教學套件核心開發板,套件包還在規劃中,大家有沒有想要套件包裡面放那些東西呢?說不定可以美夢成真喔
Arduino 101 是 Arduino.cc (注意不是 .org) 與 Intel 合作的最新開發板,在美國以外的區域稱為 Genuino 101。
延伸閱讀:
| [Make雜誌國際中文版]Arduino 101 介紹 | Arduino 101 BLE 第二課 LED呼吸燈(PWM) |
硬體架構
- Arduino 101
- Android 手機
- [非必須]LED,長腳接在 Arduino 101的D13腳位。或直接使用板載的LED也可以。
App Inventor 程式
基本上概念與咱們的[雙A計畫]完全相同,只是改用 BLE 元件而已。本範例將控制 Arduino 101 的 D13 板載 LED 燈亮滅。別忘了這樣的架構可以改成繼電器再接個檯燈或風扇,就是小小智慧家電控制囉
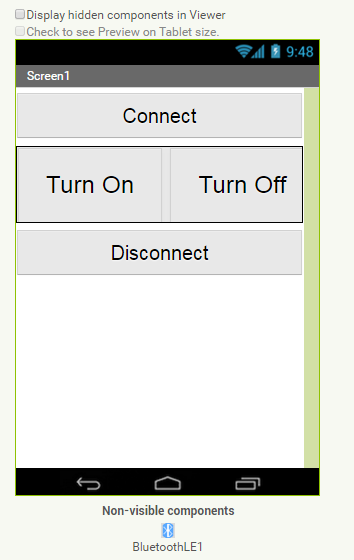
Designer 頁面
這個版面很熟悉吧,雙A計畫都長這樣嘛,差別就在於 BluetoothLE 這個元件。由於通訊協定的不同,您當然無法用原本的 BluetoothClient元件來與 Arduino 101 溝通。
Blocks 頁面
1. 連線與斷線
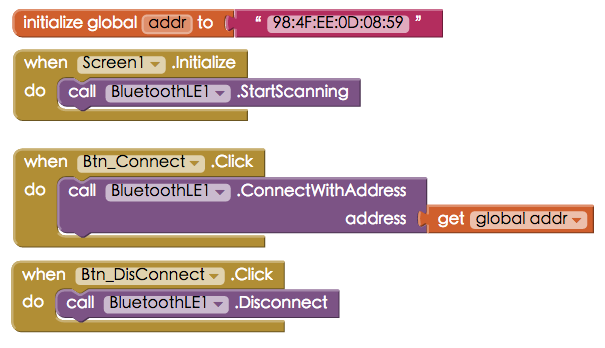
程式初始化時,要求 BluetoothLE1元件進行掃描。請注意本範例是直接對指定藍牙裝置(Arduino 101)連線。如果您日後需要從多個裝置中選擇的話,建議還是先配對再從 ListPicker 中點選是比較好的做法。請注意 BLE 元件不需要事先配對,只要指定 address 即可直接連線。
ConnectButton按下時,要求BluetoothLE1元件對指定位址的藍牙裝置(98:4F...) 進行連線。
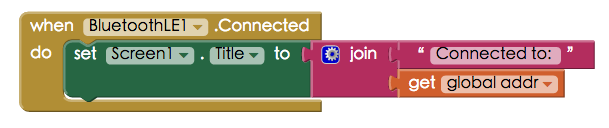
2. 連線確認
承上一步,BluetoothLE1.connected事件會在連線成功後啟動,我們在此顯示一些確認訊息。
3. 發送訊號
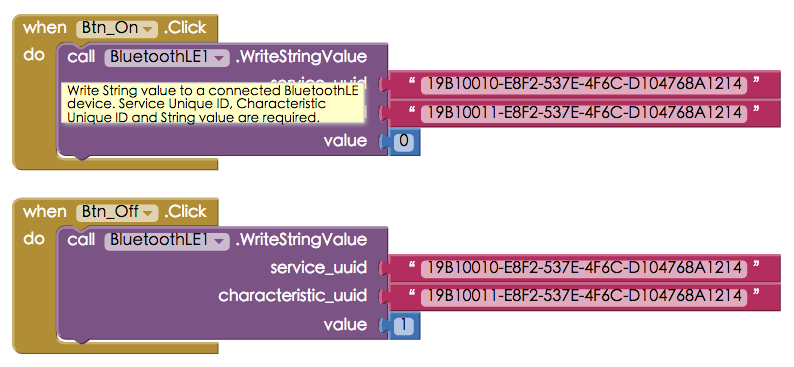
在 TurnButton按下時,使用 BluetoothLE1.WriteIntValue,Arduino 101 在接收到 value 1 之後就會點亮 LED (digitalWrite)。請注意 service_uuid 與 characteristic_uuid 這兩個欄位請分別填入"19B10010-E8F2-537E-4F6C-D104768A1214" 與 "19B10011-E8F2-537E-4F6C-D104768A1214" ,這是一組自定義的文字數字組合,Arduino 101 會使用這個參數代表它所提供的 BLE 服務。您可以使用這個網站來幫您產生 UUID
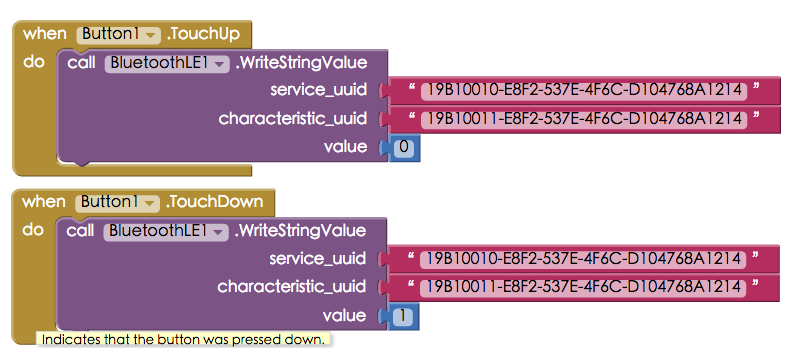
您可以把這兩個動作寫在同一個 Button 的 TouchDown 與 TouchUp 事件中,就能做到按著按鈕時開燈,放開按鈕就關燈的效果囉,例如像這樣:
4. 斷線
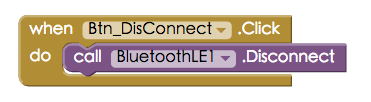
Button_Disconnect按下時,要求BluetoothLE1元件對指定藍牙裝置斷線。
Arduino 101 程式碼
本草稿碼感謝 MIT App Inventor 小組提供。請注意 Arduino 101 已經具備藍牙4.0,因此不必再外接 HC05 這類的藍牙裝置
文中一樣要寫明 service_uuid 與 characteristic_uuid,在此是一組自訂的文字分別是"19B10010-E8F2-537E-4F6C-D104768A1214" 與 "19B10011-E8F2-537E-4F6C-D104768A1214"。這要與 App Inventor 中對應,您可以使用這個網站來幫您產生 UUID
#include <CurieBLE.h>

#define LED 13

BLEPeripheral blePeripheral;  // BLE Peripheral Device (the board you're programming)
BLEService ControlLED("19B10010-E8F2-537E-4F6C-D104768A1214"); // BLE AnalogRead Service

// BLE LED Switch Characteristic - custom 128-bit UUID, read and writable by central
BLEUnsignedIntCharacteristic LEDStatus("19B10011-E8F2-537E-4F6C-D104768A1214", BLERead | BLEWrite  );

int incom = 0;
int last_incom = 0;

void setup() {
  Serial.begin(9600);
  // set Light pin to output mode
  // set advertised local name and service UUID:
  blePeripheral.setLocalName("ControlLED");
  blePeripheral.setAdvertisedServiceUuid(ControlLED.uuid());

  // add service and characteristic:
  blePeripheral.addAttribute(ControlLED);
  blePeripheral.addAttribute(LEDStatus);

  // begin advertising BLE Light service:
  blePeripheral.begin();

  Serial.println("BLE AnalogRead service.");

  pinMode(LED, OUTPUT);

}

void loop() {
  // listen for BLE peripherals to connect:

  BLECentral central = blePeripheral.central();
  // if a central is connected to peripheral:
  if (central) {
    Serial.print("Connected to central: ");
    // print the central's MAC address:
    Serial.println(central.address());


    // while the central is still connected to peripheral:
    while (central.connected()) {
      //Serial.println(LEDStatus.written());


      if (LEDStatus.written())
      {
        incom = LEDStatus.value();
        Serial.print("incom ");
        Serial.println(incom);
        if (incom != last_incom)
        {
          if (incom == 1)
          {
            Serial.println("LED On");

            digitalWrite(LED, HIGH);
          }
          else
          {
            Serial.println("LED Off");
            digitalWrite(LED, LOW);
          }
        }
        last_incom = incom;
      }
    }

    delay(100);
  }

  // when the central disconnects, print it out:

  Serial.print(F("Disconnected from central: "));
  Serial.println(central.address());
}
本文發表於MIT App Inventor,並標記arduino、Arduino/Genuino101、ble、bluetooth、MIT App Inventor、物聯網。
留言 💬 (0)
還沒有留言,來當第一個。