


在學這篇教學前必須要先會一些事情,首先必須要會在Lattepanda上使用visual studio
(LattePanda 拿鐵熊貓教學:Arduino與Visual Studio環境設定)。
再來必須已經了解如何在visual studio裡使用C#控制Arduino的I/O
(LattePanda 拿鐵熊貓教學#1:LED 閃爍,使用Visual Studio)。
在這篇教學中會使用visual studio的C#來開發簡單的門鎖系統,一般在藍牙使用上都是使用藍牙傳輸資料,但在這篇是使用藍牙4.0中的iBeacon模式,在iBeacon模式中可以得知接收器與發射器的距離,而這個距離就可以當作我們決定要不要開門的條件,所以這樣連按按鈕的動作都可以省去。
| 作者/攝影 | 黃品叡 |
| 時間 | 3 小時 以上 |
| 難度 |
★★★★★ |
| 材料表 |
|
![]()
在這篇教學中分成硬體、軟體兩個部分,(1)硬體部分是電路的連接, (2)軟體部分是Visual Studio C#的程式撰寫。
(1)=====硬體部分:=====
在硬體連接的電路圖如下圖。
使用的有
- 兩個<LED>燈(顯示門鎖是開啟還是關閉)
- 一個12V的<LOCK>電磁鎖
- 一個<USB to UART模組>
- 兩個<HM10>的BLE模組,一個安裝至LattePanda,一個由使用者持有

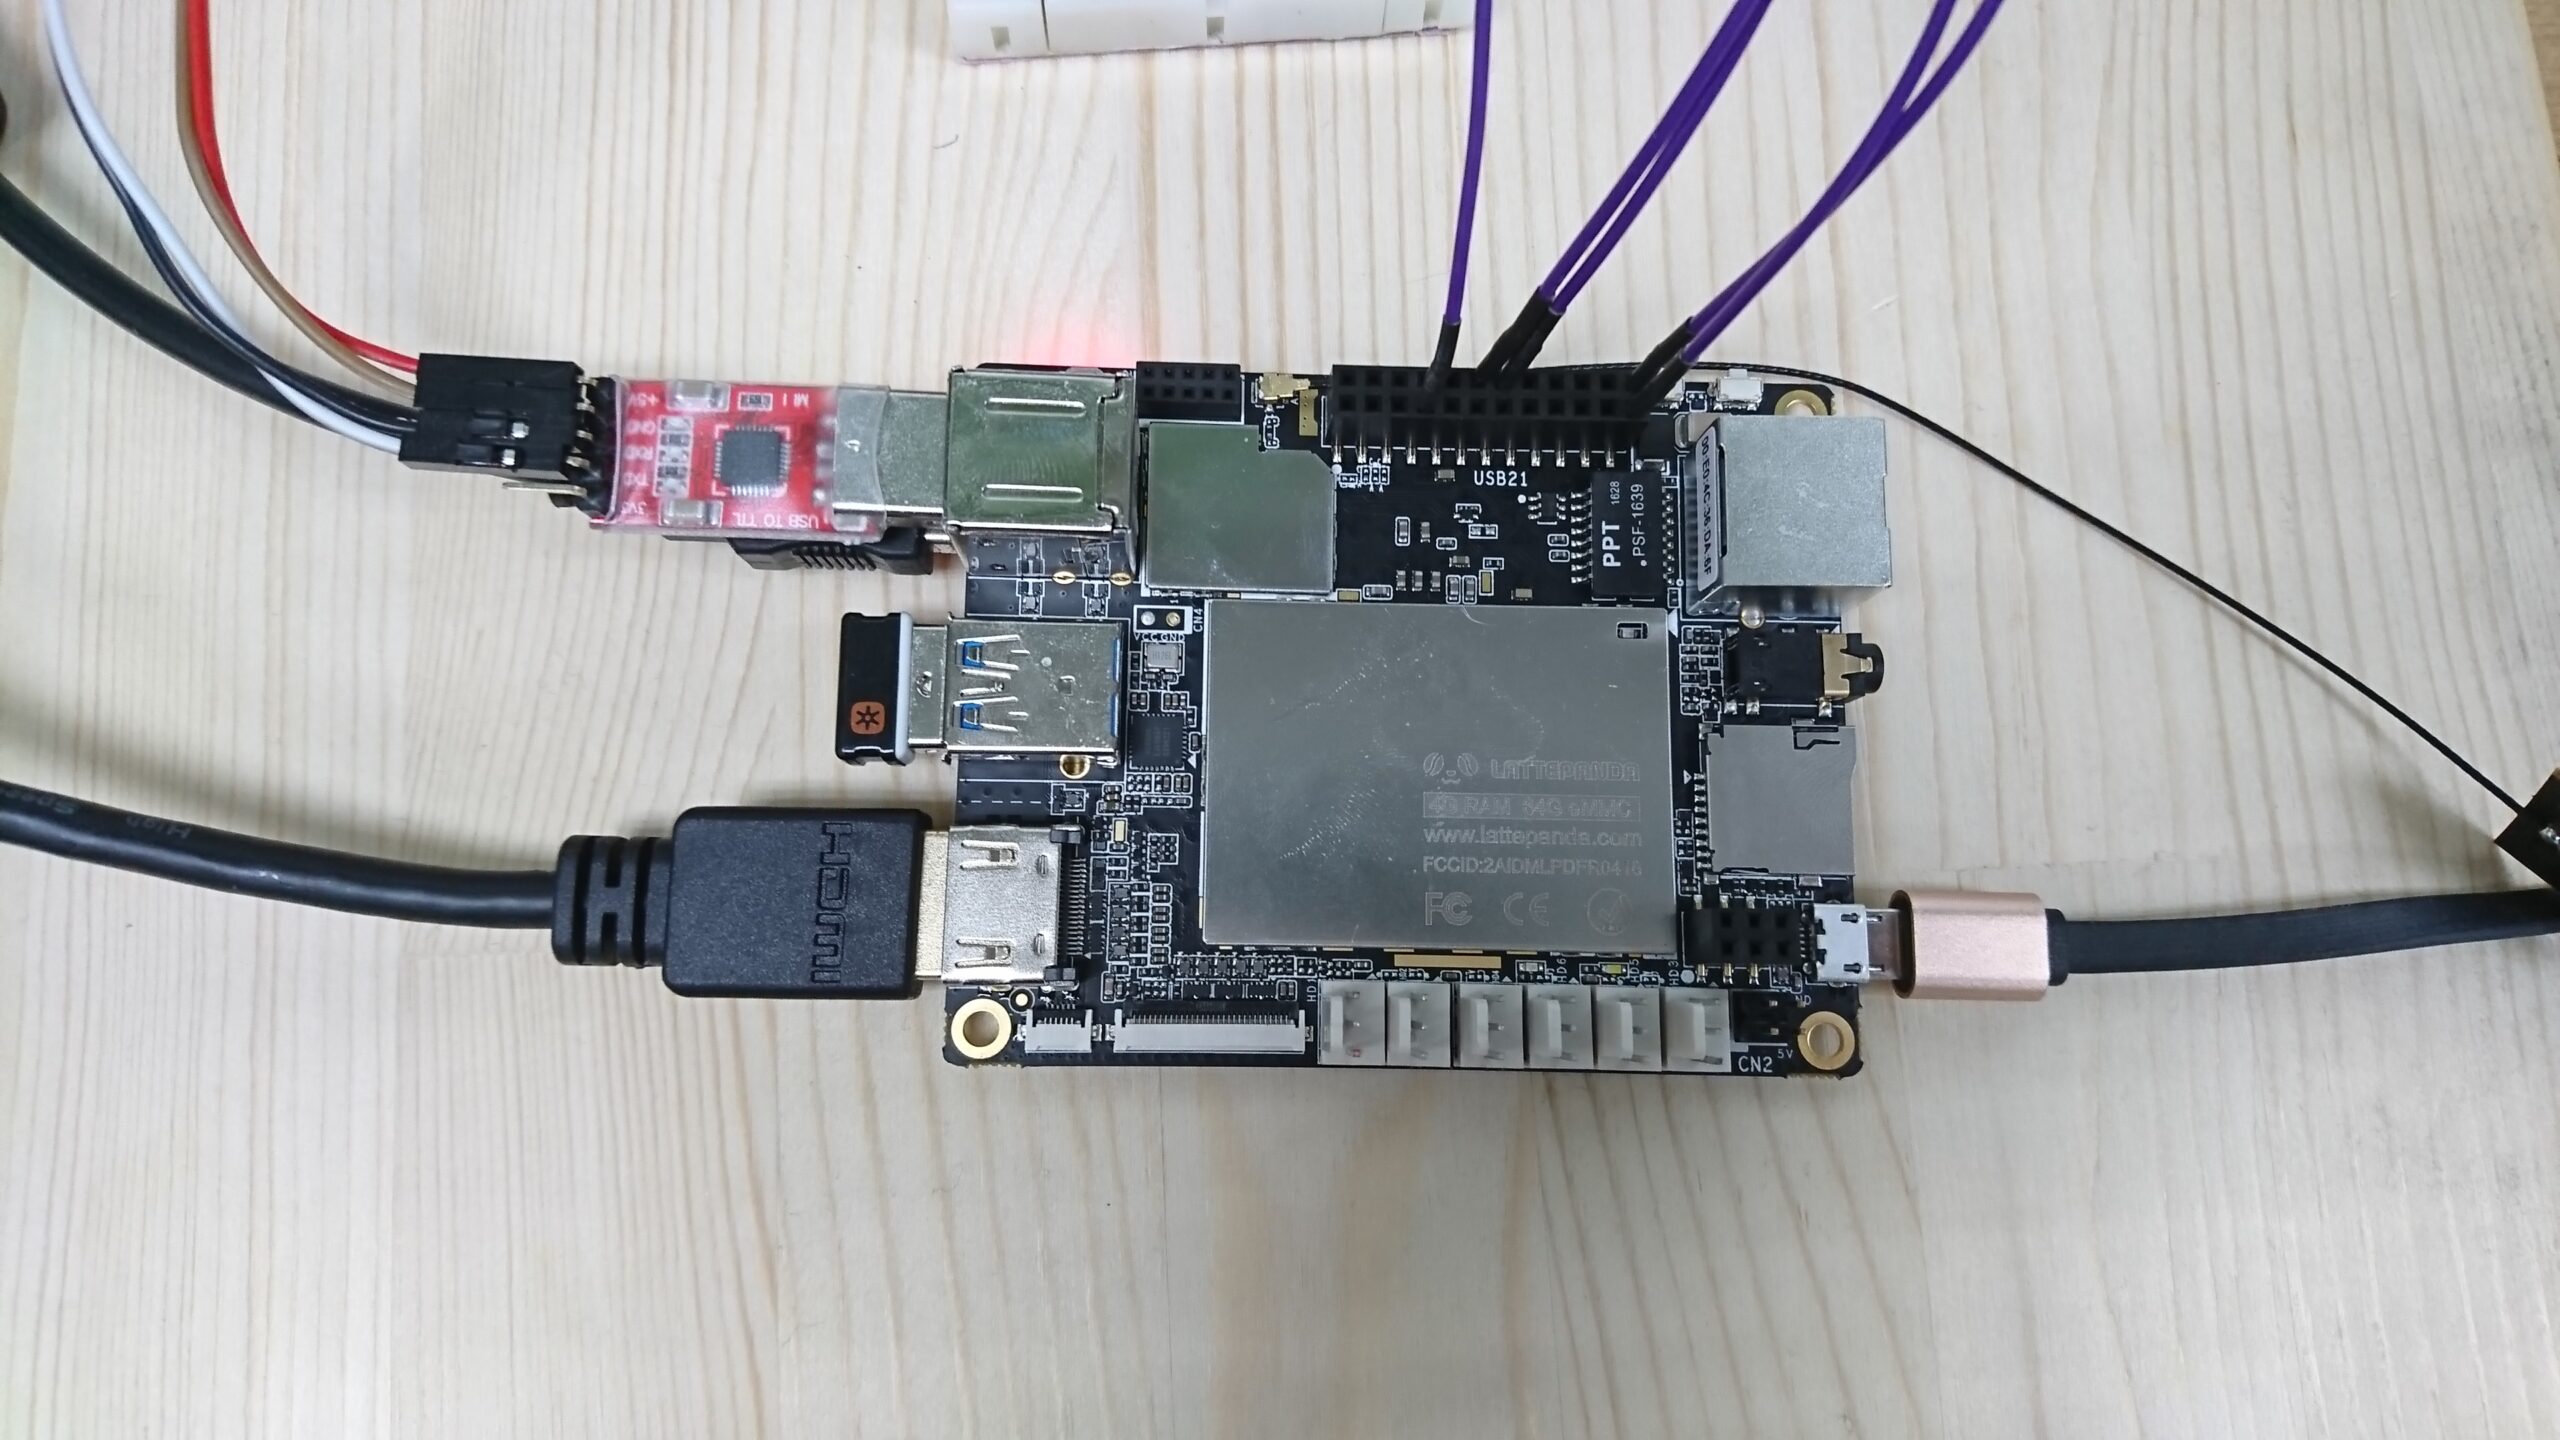
下圖Lattepanda上左方USB孔上接上USB to UART模組(紅色),可接上HM10 BLE模組。
對應電路圖,接在麵包版上電路如下圖
整體看起來會是像下圖
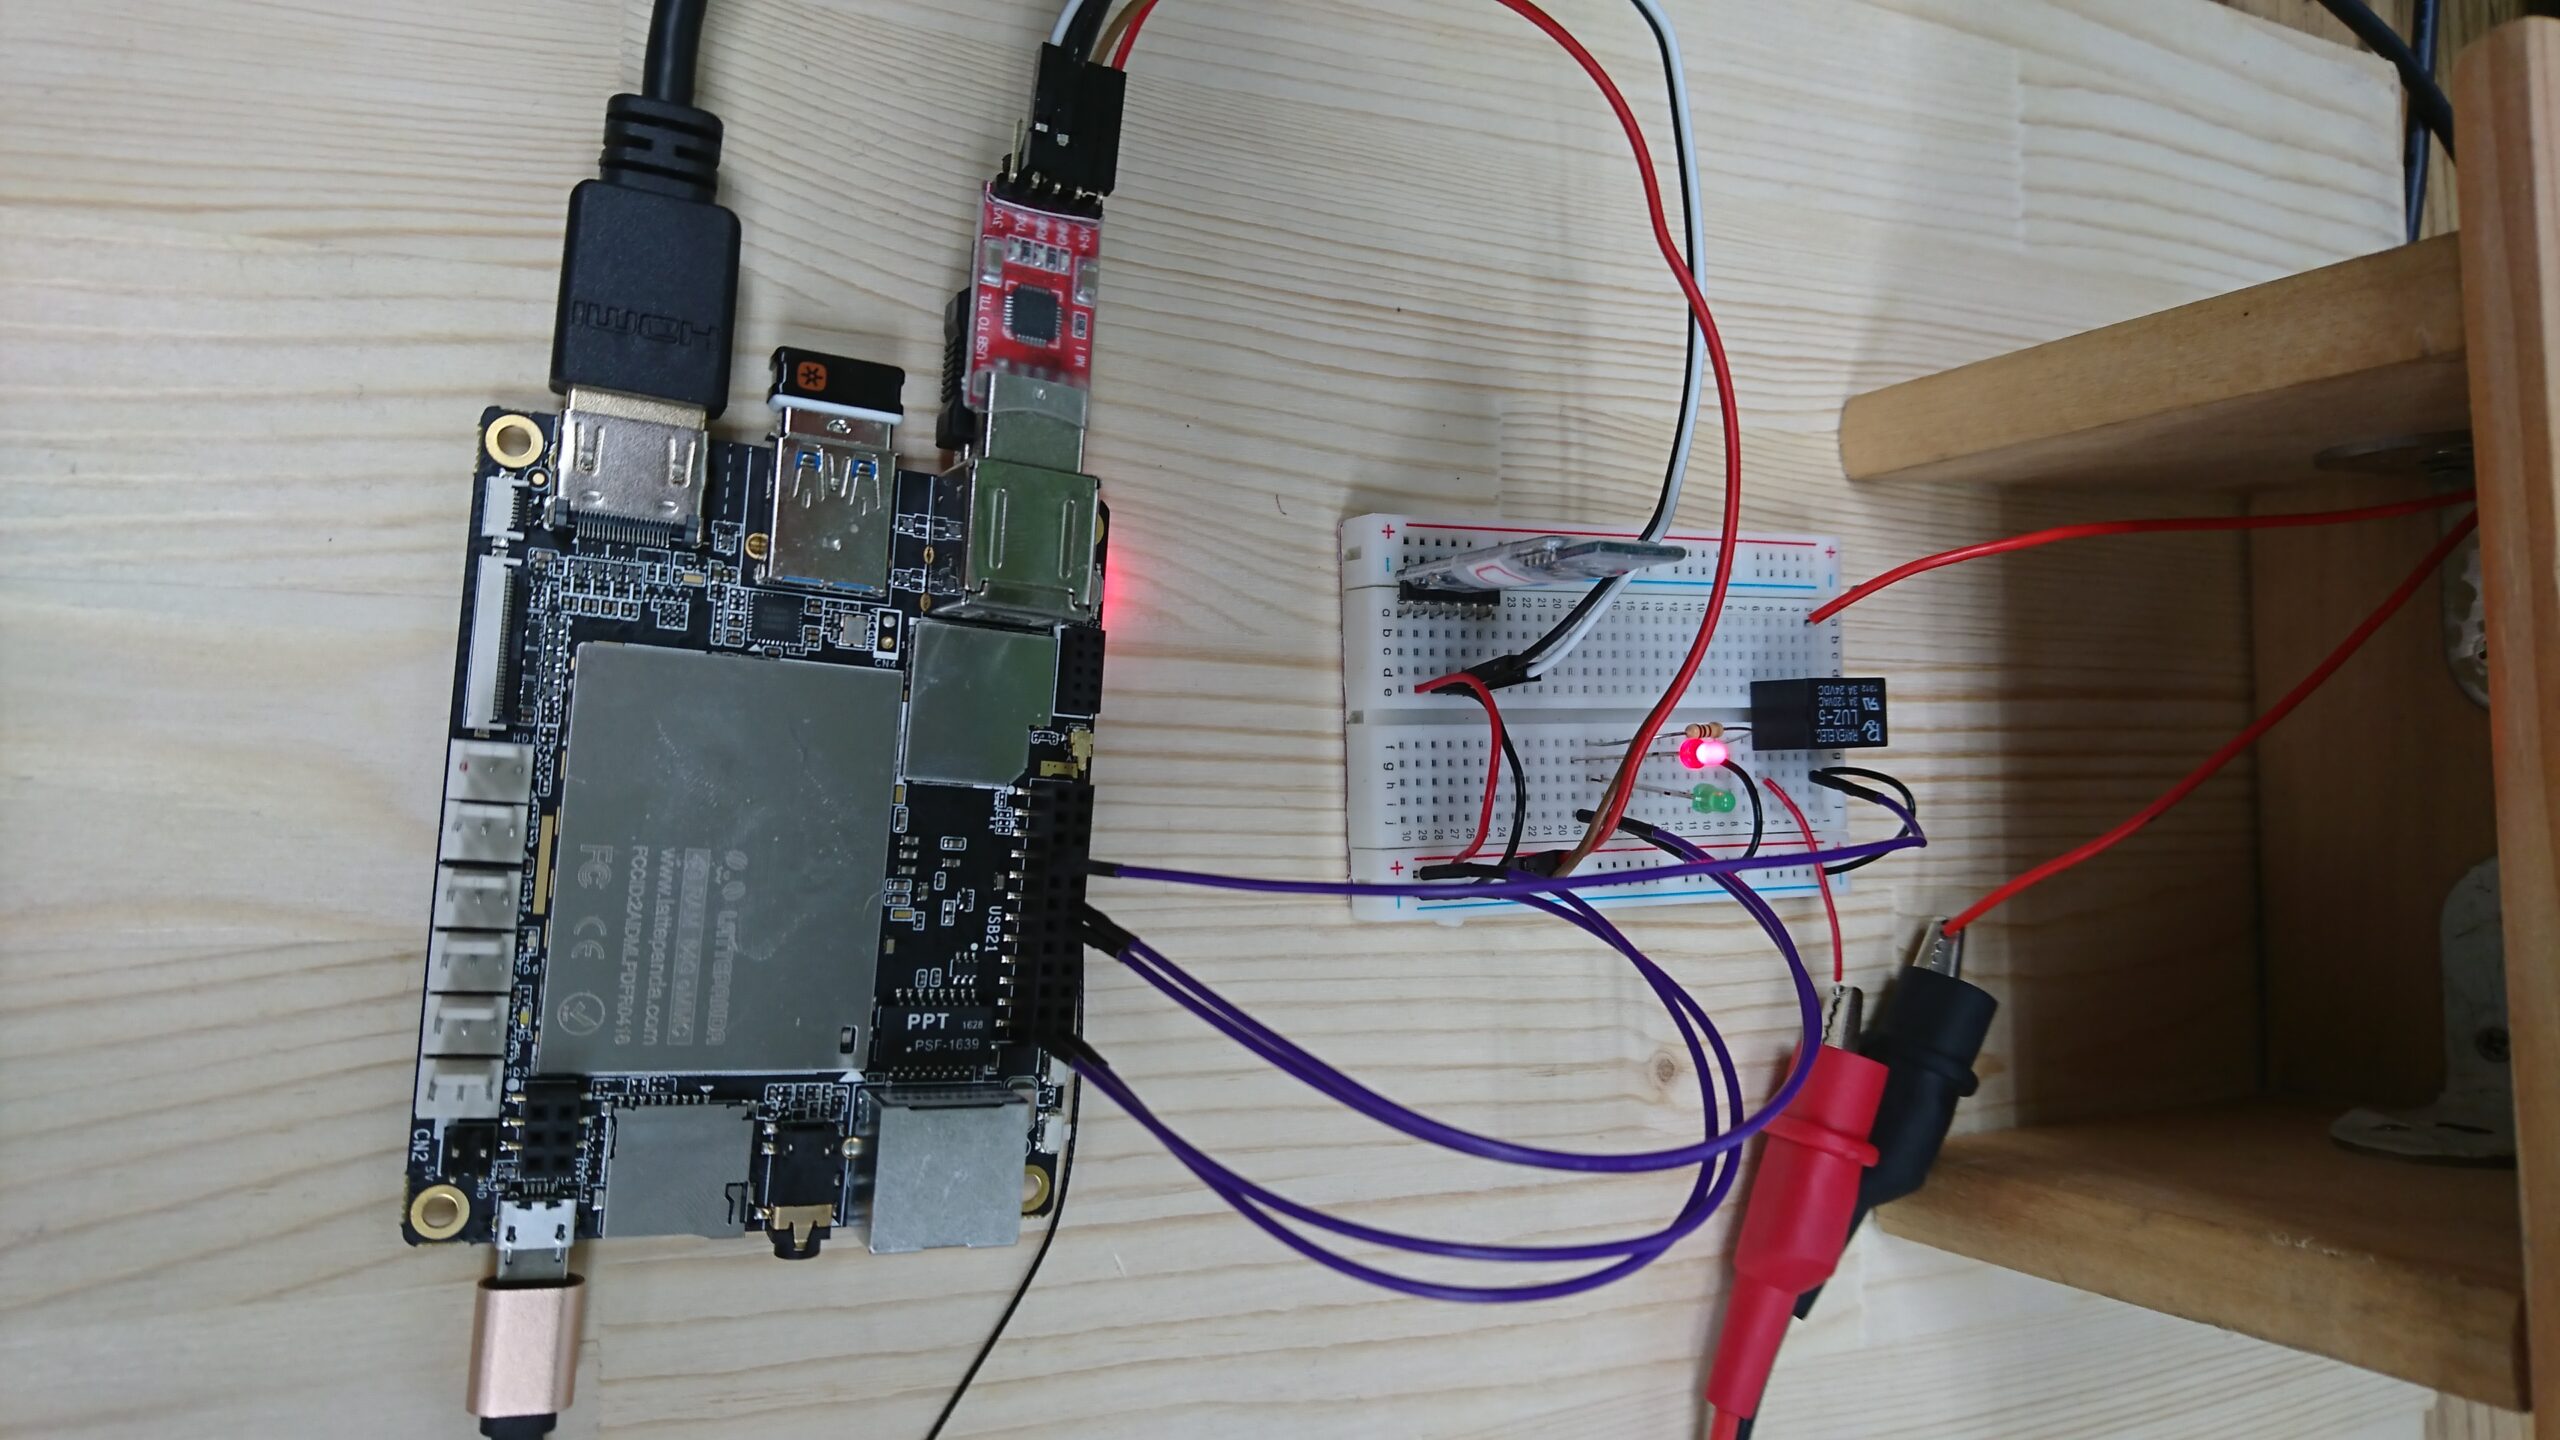
換個角度再放一張圖,如下

在電磁鎖的部分基本上可以任意替換,在這裡我將它鎖在木板上,能夠表示他有鎖住或打開而已,其安裝後的圖如下(上方是一塊木板連結鐵塊,下面則是一個「ㄇ」字形的木板連結電磁鐵的線圈部分)。

(2)=====軟體部分:=====
我使用的程式開發環境是Windows 10、Visual studio 2017、C#,那我們就直接進入程式部分。
程式我分成(1)介面、(2)初始化、(3)Serial連接、(4)開啟backgroundWorker、(5)讀取iBeacon資訊、(6)iBeacon資訊解碼、(7)連結Arduino,這幾個部分。
1.介面
Form1中的介面配置如下圖
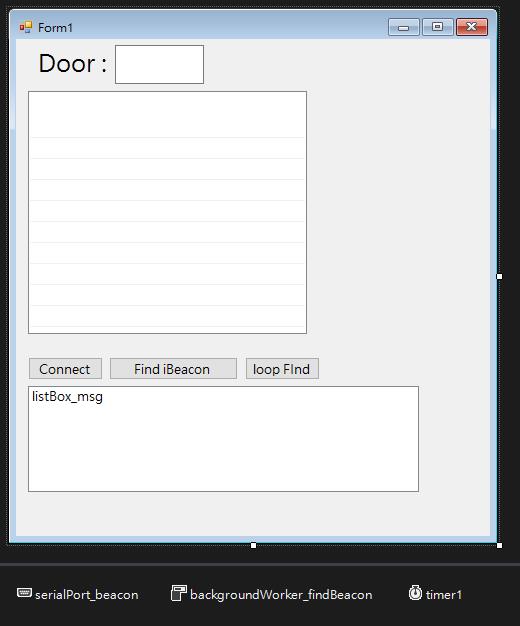
各個介面的命名可以參考下圖:

命名如果不一樣,請記得在程式中自行修改。
2.初始化
初始化的部分先從 include開始:
[pastacode lang=”c” manual=”using%20System%3B%0Ausing%20System.ComponentModel%3B%0Ausing%20System.Drawing%3B%0Ausing%20System.Windows.Forms%3B%0Ausing%20System.IO.Ports%3B%20%2F%2Fserial%0Ausing%20LattePanda.Firmata%3B%20%2F%2FArduino%0A” message=”” highlight=”” provider=”manual”/]以上是所有要用到的namespace。
在全域變數裡:
[pastacode lang=”c” manual=”Arduino%20arduino%20%3D%20new%20Arduino(%22COM3%22%2C%2057600)%3B%0Abool%5B%5D%20openlist%20%3D%20new%20bool%5B3%5D%3B%0A” message=”” highlight=”” provider=”manual”/](全域變數記得是寫在 class Form1 裡面,但是在一般函式外面)
在Form1()建構式裡:
[pastacode lang=”c” manual=”public%20Form1()%0A%7B%0AInitializeComponent()%3B%0AColumnHeader%20header1%2C%20header2%3B%0Aheader1%20%3D%20new%20ColumnHeader()%3B%0Aheader2%20%3D%20new%20ColumnHeader()%3B%0A%0Aheader1.Text%20%3D%20%22–Time–%22%3B%0Aheader1.TextAlign%20%3D%20HorizontalAlignment.Center%3B%0Aheader1.Width%20%3D%2090%3B%0Aheader2.Text%20%3D%20%22–ID–%22%3B%0Aheader2.TextAlign%20%3D%20HorizontalAlignment.Center%3B%0Aheader2.Width%20%3D%2070%3B%0A%0AlistView_door.Columns.Add(header1)%3B%0AlistView_door.Columns.Add(header2)%3B%0A%0A%2F%2Fwhich%20ID%20can%20open%20the%20lock%0Aopenlist%5B0%5D%20%3D%20false%3B%0Aopenlist%5B1%5D%20%3D%20true%3B%0Aopenlist%5B2%5D%20%3D%20true%3B%0A%0A%2F%2Farduino%20setting%0Aarduino.pinMode(5%2C%20Arduino.OUTPUT)%3B%2F%2Fpin%20of%20red%20LED%0Aarduino.pinMode(6%2C%20Arduino.OUTPUT)%3B%2F%2Fpin%20of%20green%20LED%0Aarduino.pinMode(10%2C%20Arduino.OUTPUT)%3B%2F%2Fpin%20of%20the%20lock%0A%0A%2F%2Fset%20the%20door%20close%20first%0AdoorOpen(false)%3B%0AtextBox_door.BackColor%20%3D%20Color.Red%3B%0A%7D%0A” message=”” highlight=”” provider=”manual”/](這裡面設定了一些介面的東西,一些初始值還有門鎖狀態)
3.Serial連接
Serial 連接在C#中非常簡單,我是用一個按鈕,按下後連結Serial程式如下:
[pastacode lang=”c” manual=”private%20void%20button_connect_Click(object%20sender%2C%20EventArgs%20e)%0A%7B%0AserialPort_beacon%20%3D%20new%20SerialPort(%22COM6%22%2C%209600%2C%20Parity.None%2C%208%2C%20StopBits.One)%3B%0A%0Aif%20(!serialPort_beacon.IsOpen)%0A%7B%0Atry%0A%7B%0AserialPort_beacon.Open()%3B%0AlistBox_msg.Items.Add(%22Connect%22)%3B%0A%7D%0Acatch%0A%7B%0AMessageBox.Show(%22Serial%20open%20error!%22)%3B%0A%7D%0A%7D%0Aelse%0AlistBox_msg.Items.Add(%22Opened%22)%3B%0A%7D%0A” message=”” highlight=”” provider=”manual”/]
(這個COM是USB to URAT晶片的COM角)
4.開啟backgroundWorker
首先是按鈕觸發尋找Beacon:
[pastacode lang=”c” manual=”private%20void%20button_findBeacon_Click(object%20sender%2C%20EventArgs%20e)%0A%7B%0A%2F%2Fsend%20DISC%0Astring%20msgSend%20%3D%20%22AT%2BDISI%3F%22%3B%0Abyte%5B%5D%20buffer%20%3D%20System.Text.Encoding.Default.GetBytes(msgSend)%3B%0Aif%20(serialPort_beacon.IsOpen)%0Aif%20(backgroundWorker_findBeacon.IsBusy%20!%3D%20true)%0A%7BserialPort_beacon.Write(buffer%2C%200%2C%20buffer.Length)%3B%0AbackgroundWorker_findBeacon.RunWorkerAsync()%3B%0A%7D%0Aelse%0AMessageBox.Show(%22already%20finding%22)%3B%0Aelse%0AMessageBox.Show(%22Serial%20is%20close%22)%3B%0A%7D%0A” message=”” highlight=”” provider=”manual”/]
(在這裡是開啟一個backgroundWorker,而這裡只是單純地尋找一次Beacon而已)
若是要持續尋找,可以開啟一個timer來持續觸發,程式如下:
[pastacode lang=”c” manual=”private%20void%20button_loopFind_Click(object%20sender%2C%20EventArgs%20e)%0A%7B%0Atimer1.Start()%3B%0A%7D%0Aprivate%20void%20timer1_Tick(object%20sender%2C%20EventArgs%20e)%0A%7B%0A%2F%2Fsend%20DISC%0Astring%20msgSend%20%3D%20%22AT%2BDISI%3F%22%3B%0Abyte%5B%5D%20buffer%20%3D%20System.Text.Encoding.Default.GetBytes(msgSend)%3B%0Aif%20(serialPort_beacon.IsOpen)%0Aif%20(backgroundWorker_findBeacon.IsBusy%20!%3D%20true)%0A%7B%0AserialPort_beacon.DiscardInBuffer()%3B%0AserialPort_beacon.Write(buffer%2C%200%2C%20buffer.Length)%3B%0AbackgroundWorker_findBeacon.RunWorkerAsync()%3B%0A%7D%0Aelse%0AConsole.Write(%22already%20finding%22)%3B%0Aelse%0AMessageBox.Show(%22Serial%20is%20close%22)%3B%0A%7D%0A” message=”” highlight=”” provider=”manual”/](這裡開一個Timer讓我們可以每一段時間就開啟backgroundWorker)
5.讀取iBeacon資訊
這裡就是backgroundWorker裡所做的事情
[pastacode lang=”c” manual=”private%20void%20backgroundWorker_findBeacon_DoWork(object%20sender%2C%20DoWorkEventArgs%20e)%0A%7B%0ABackgroundWorker%20worker%20%3D%20sender%20as%20BackgroundWorker%3B%0A%0Achar%5B%5D%20buffer%20%3D%20new%20char%5B256%5D%3B%0Astring%20msg_read%20%3D%20%22%22%3B%0Abool%20stringCheck%20%3D%20false%3B%0A%2F%2Fread%20data%0Abyte%20loopCount%20%3D%200%3B%0A%0Awhile%20(true)%0A%7B%0Aif%20(serialPort_beacon.BytesToRead%20%3E%200)%0A%7B%0A%2F%2Fserial%20read%20to%20msg_read%0AserialPort_beacon.Read(buffer%2C%200%2C%20buffer.Length)%3B%0Afor%20(int%20i%20%3D%200%3B%20i%20%3C%20buffer.Length%20%26%26%20buffer%5Bi%5D%20!%3D%20’%5C0’%3B%20i%2B%2B)%0Amsg_read%20%2B%3D%20buffer%5Bi%5D%3B%0A%0A%2F%2Fif%20msg_read%20end%20with%20%22OK%2BDISCE%22%20then%20stop%20reading%0Aif%20(msg_read.Length%20%3E%208%20%26%26%20msg_read.IndexOf(%22OK%2BDISCE%22)%20!%3D%20-1)%0A%7B%0AstringCheck%20%3D%20true%3B%0Abreak%3B%0A%0A%7D%0A%7D%0Aelse%0A%7B%0A%2F%2Ftimeout%0ASystem.Threading.Thread.Sleep(500)%3B%0AloopCount%2B%2B%3B%0Astring%20dot%20%3D%20%22%22%3B%0Afor%20(int%20i%20%3D%201%3B%20i%20%3C%3D%20loopCount%3B%20i%2B%2B)%0Adot%20%3D%20dot%20%2B%20%22.%20%22%3B%0A%0Aif%20(loopCount%20%3E%201)%0Athis.Invoke((MethodInvoker)(()%20%3D%3E%20listBox_msg.Items.RemoveAt(listBox_msg.Items.Count%20-%201)))%3B%0Aif%20(loopCount%20%3E%2015)%0Abreak%3B%0Athis.Invoke((MethodInvoker)(()%20%3D%3E%20listBox_msg.Items.Add(dot)))%3B%0A%7D%0A%7D%0A%0A%2F%2Fif%20didn’t%20read%20anything%20than%20prient%20%22time%20out%22%0Aif%20(msg_read%20%3D%3D%20%22%22)%0Athis.Invoke((MethodInvoker)(()%20%3D%3E%20listBox_msg.Items.Add(%22Time%20out%22)))%3B%0Aelse%0A%7B%0Aif%20(stringCheck%20%3D%3D%20false)%0A%2F%2Fif%20have%20read%20something%20but%20not%20iBeacon%20info%0Athis.Invoke((MethodInvoker)(()%20%3D%3E%20listBox_msg.Items.Add(msg_read)))%3B%0Aelse%0A%7B%0ATuple%3Cint%5B%5D%2C%20int%5B%5D%2C%20int%5B%5D%2C%20int%3E%20result%20%3D%20deCodeDISI(msg_read%2C%202)%3B%0Athis.Invoke((MethodInvoker)(()%20%3D%3E%20listBox_msg.Items.Add(%22minor%20%3A%20%22%20%2B%20result.Item2%5B0%5D.ToString())))%3B%0Athis.Invoke((MethodInvoker)(()%20%3D%3E%20listBox_msg.Items.Add(%22RSS%20%3A%20%22%20%2B%20result.Item3%5B0%5D.ToString())))%3B%0A%2F%2Fif%20is%20close%20enough%20and%20it’s%20in%20open%20list%20then%20open%20the%20lock%0Aif%20(result.Item3%5B0%5D%20%3E%20-40%20%26%26%20openlist%5Bresult.Item2%5B0%5D%5D%20%3D%3D%20true)%0A%7B%0Athis.Invoke((MethodInvoker)(()%20%3D%3E%20textBox_door.BackColor%20%3D%20Color.Green))%3B%0AListViewItem%20item1%20%3D%20new%20ListViewItem(DateTime.Now.ToShortTimeString())%3B%0Aitem1.SubItems.Add(result.Item2%5B0%5D.ToString())%3B%0Athis.Invoke((MethodInvoker)(()%20%3D%3E%20listView_door.Items.Add(item1)))%3B%0AdoorOpen(true)%3B%0A%7D%0Aelse%0A%7B%0Athis.Invoke((MethodInvoker)(()%20%3D%3E%20textBox_door.BackColor%20%3D%20Color.Red))%3B%0AdoorOpen(false)%3B%0A%7D%0A%7D%0A%7D%0A%7D%0A” message=”” highlight=”” provider=”manual”/]
(這裡的程式包含好多東西,上半部分是在處理Serial read的問題,並且在讀取中有動態的「…」做顯示,若沒有收到資料則會有「time out」的資訊出現。下半部分是將得到的資訊做判斷,判斷要不要開門)
6.iBeacon資訊解碼
這裡是「deCodeDISI」副函式的程式部分:
[pastacode lang=”c” manual=”private%20Tuple%3Cint%5B%5D%2C%20int%5B%5D%2C%20int%5B%5D%2C%20int%3E%20deCodeDISI(string%20serialData%2C%20int%20maxDiviceCount)%0A%7B%0A%0A%2F%2FOK%2BDISIS%20%20OK%2BDISC%20%3A%20Factory%20ID%20%3A%20iBeacon%20UUID%20%3A%20Major%2BMinor%2BMeasured%20%3A%20MAC%20%3A%20RSSI%20%20OK%2BDISCE%0A%2F%2FOK%2BDISISOK%2BDISC%3A4C000215%3A74278BDAB64445208F0C720EAF059935%3A11110001C5%3A88C25532ED1E%3A-032OK%2BDISCE%0A%0Astring%20DataRemain%20%3D%20serialData%3B%0Aint%5B%5D%20FactoryID%20%3D%20new%20int%5BmaxDiviceCount%5D%3B%0Astring%5B%5D%20UUID%20%3D%20new%20string%5BmaxDiviceCount%5D%3B%0Aint%5B%5D%20Major%20%3D%20new%20int%5BmaxDiviceCount%5D%3B%0Aint%5B%5D%20Minor%20%3D%20new%20int%5BmaxDiviceCount%5D%3B%0Astring%5B%5D%20MAC%20%3D%20new%20string%5BmaxDiviceCount%5D%3B%0Aint%5B%5D%20RSSvalue%20%3D%20new%20int%5BmaxDiviceCount%5D%3B%0ADataRemain%20%3D%20DataRemain.Substring(0%2C%20serialData.IndexOf(%22OK%2BDISCE%22))%3B%0Aint%20count%20%3D%200%3B%0Awhile%20(true)%0A%7B%0Aint%20findNum%20%3D%20DataRemain.IndexOf(%22%3A%22)%3B%0Aif%20(findNum%20%3D%3D%20-1)%0A%7B%0AConsole.Write(%22deCode%20done!%22)%3B%0Abreak%3B%0A%7D%0Aelse%0A%7B%0A%2F%2FFactory%20ID%20(length%208)%0Astring%20FactoryID_str%20%3D%20DataRemain.Substring(findNum%20%2B%201%2C%208)%3B%0ADataRemain%20%3D%20DataRemain.Substring(findNum%20%2B%209)%3B%0AFactoryID%5Bcount%5D%20%3D%20Convert.ToInt32(FactoryID_str%2C%2016)%3B%0A%0A%2F%2FiBeacon%20UUID%0AfindNum%20%3D%20DataRemain.IndexOf(%22%3A%22)%3B%0Astring%20UUID_str%20%3D%20DataRemain.Substring(findNum%20%2B%201%2C%2032)%3B%0ADataRemain%20%3D%20DataRemain.Substring(findNum%20%2B%2033)%3B%0AUUID%5Bcount%5D%20%3D%20UUID_str%3B%0A%0A%2F%2FMajor%0AfindNum%20%3D%20DataRemain.IndexOf(%22%3A%22)%3B%0Astring%20Major_str%20%3D%20DataRemain.Substring(findNum%20%2B%201%2C%204)%3B%0ADataRemain%20%3D%20DataRemain.Substring(findNum%20%2B%205)%3B%0AMajor%5Bcount%5D%20%3D%20Convert.ToInt32(Major_str)%3B%0A%2F%2FMinor%0Astring%20Minor_str%20%3D%20DataRemain.Substring(0%2C%204)%3B%0ADataRemain%20%3D%20DataRemain.Substring(findNum%20%2B%204)%3B%0AMinor%5Bcount%5D%20%3D%20Convert.ToInt32(Minor_str)%3B%0A%0A%2F%2FMAC%0AfindNum%20%3D%20DataRemain.IndexOf(%22%3A%22)%3B%0Astring%20MAC_str%20%3D%20DataRemain.Substring(findNum%20%2B%201%2C%2012)%3B%0ADataRemain%20%3D%20DataRemain.Substring(findNum%20%2B%2013)%3B%0AMAC%5Bcount%5D%20%3D%20MAC_str%3B%0A%0A%2F%2FRSS%0AfindNum%20%3D%20DataRemain.IndexOf(%22%3A%22)%3B%0Astring%20RSS_str%20%3D%20DataRemain.Substring(findNum%20%2B%201%2C%204)%3B%0ADataRemain%20%3D%20DataRemain.Substring(findNum%20%2B%205)%3B%0ARSSvalue%5Bcount%5D%20%3D%20Convert.ToInt32(RSS_str)%3B%0A%0Acount%2B%2B%3B%0A%7D%0A%7D%0A%0Areturn%20Tuple.Create(Major%2C%20Minor%2C%20RSSvalue%2C%20count)%3B%0A%7D%0A” message=”” highlight=”” provider=”manual”/](這就是解碼iBeacon的資訊的部分)
7.連結Arduino
跟Arduino的部分非常簡單,只有控制I/O的部分,D10腳位控制繼電器、D5控制紅色LED、D6控制綠色LED燈,副程式如下:
[pastacode lang=”c” manual=”private%20void%20doorOpen(bool%20open)%0A%7B%0Aif%20(open%20%3D%3D%20false)%2F%2Fdoor%20close%0A%7B%0A%2F%2Flock%20the%20door%20and%20red%20LED%20on%0Aarduino.digitalWrite(10%2C%20Arduino.HIGH)%3B%0Aarduino.digitalWrite(5%2C%20Arduino.HIGH)%3B%0Aarduino.digitalWrite(6%2C%20Arduino.LOW)%3B%0A%7D%0Aelse%2F%2Fdoor%20open%0A%7B%0A%2F%2Funlock%20the%20door%20and%20green%20LED%20on%0Aarduino.digitalWrite(10%2C%20Arduino.LOW)%3B%0Aarduino.digitalWrite(5%2C%20Arduino.LOW)%3B%0Aarduino.digitalWrite(6%2C%20Arduino.HIGH)%3B%0A%7D%0A%7D%0A” message=”” highlight=”” provider=”manual”/]
軟體部分就是以上程式了,其中包含了非常多的細節,像是處理Serial的部分,或是執行續(就是backgroundWorker)裡的處理,為什麼用Invoke,Tuple的用法,解碼的處理…等,這些初學的話建議複製副函式,直接用就好,裡面是什麼等對於程式更清楚後再慢慢回來看。
而當然這些副函式並不能稱作完美,例如並沒有對於不完整的iBeacon資訊做處理的地方,只有稍微確認,和在資訊結尾做非常簡單的處理,在這裡主要就是帶大家入門,在深入的部分,就請大家自己研究瞜~
相關文章:
- LattePanda 開機步驟與連接螢幕
- LattePanda 拿鐵熊貓教學:Arduino與Visual Studio環境設定
- LattePanda 拿鐵熊貓教學#1:LED 閃爍,使用Visual Studio


